How Can We Help?
HoudiniEsq Workflow
Workflow
Tasks and Automation
Administrator Tutorial
Imagine if you could define a set of rules that would automatically generate all the Todos and Events needed to move a Matter from initiation to closure. Imagine if you could generate work products, send correspondence, and create records automatically. Imagine effortlessly changing a Todo’s or Event’s state or status with a simple drag of your mouse firing automation routines you can define. Imagine knowing the progress of your case, project or matter with just a glance.
Well you don’t have to imagine. HoudiniEsq Workflow does all of the above and more.
Introduction
Workflows in HoudiniEsq are a collection of Workflow Templates that define Tasks and Automation Routines that fire automatically when a user changes the state or status of a Task. Tasks can be assigned to one or more staff, and the progress of each task is tracked in real-time visually for any given Matter.

Workflows in HoudiniEsq use a Kanban board to visualize a matter’s Todos and Tasks. Kanban is Japanese for visual card. A Kanban is an agile method of viewing a list of tasks or todos and the steps that must be completed to advance the task or todo to the next step or status. Work tasks are represented visually. Staff members having access to the matter can see the status of every task, todo or event with just a glance of the matter’s Workflow tab.
Terms
The following terms are used throughout this document.
Task
Tasks are Todos created by a workflow under a matter’s Workflow tab.
Classification
The Workflow’s Classification criteria uses the Matter’s Classification Fields as the sole rule that activates a matter’s Workflow.
Workflow
A Workflow is units of work that pass from incomplete to completed and any steps in-between. HoudiniEsq Workflow is a bit more and can be described as
A collection of Task (units of work) that must be completed to move a case, project or the matter to the next phase, stage, step, or status.
A defined number of steps to complete the Tasks e.g. “Incomplete, Filed, …, Completed”.
Automatically generate one or more work products when the state or status of a Task changes i.e. “Completed”.
Template
A Workflow Template has three parts each is described below.
1. Matter Classification Criteria.
2. Steps to complete Tasks. Remember Task are Todos created by a Workflow.
3. Automation Routines to execute when the status of a Task changes. Generate docs, emails, todos, events, etc.
When the Workflow’s Template Classification matches a Matter’s Classification fields the workflow becomes active and the defined Tasks are used to create the required Todos, Events, correspondence and work products under the active matter.
Trigger
A Trigger is a filter or rule that causes an Automation Routine to run.
An example of a trigger is a user exits a date field (trigger).
Actions
Actions are software procedures that perform work such as showing a popup (action).
Automation Routine
Automation Routines consist of triggers and actions to execute when the trigger evaluates to true.
An example is a user drags a task to another swim lane. Triggers that are evaluated to be true will execute their Actions.
What to Expect
This lesson involves creating workflow templates that will automatically create all the Todos and or Events required by a Practice Area and the Steps needed to complete each. You will define one or more Tasks and optionally add Automation Routines to each that will create work products such as docs or sending emails, etc automatically whenever a user changes the Todos state or status.
This is a complex subject due to the number of options and wizard screens but should only take 30-45 minutes to complete if you choose to follow along in HoudiniEsq or a 10 minute read.
General Concepts
These general concepts will get you familiar with HoudiniEsq Workflow.
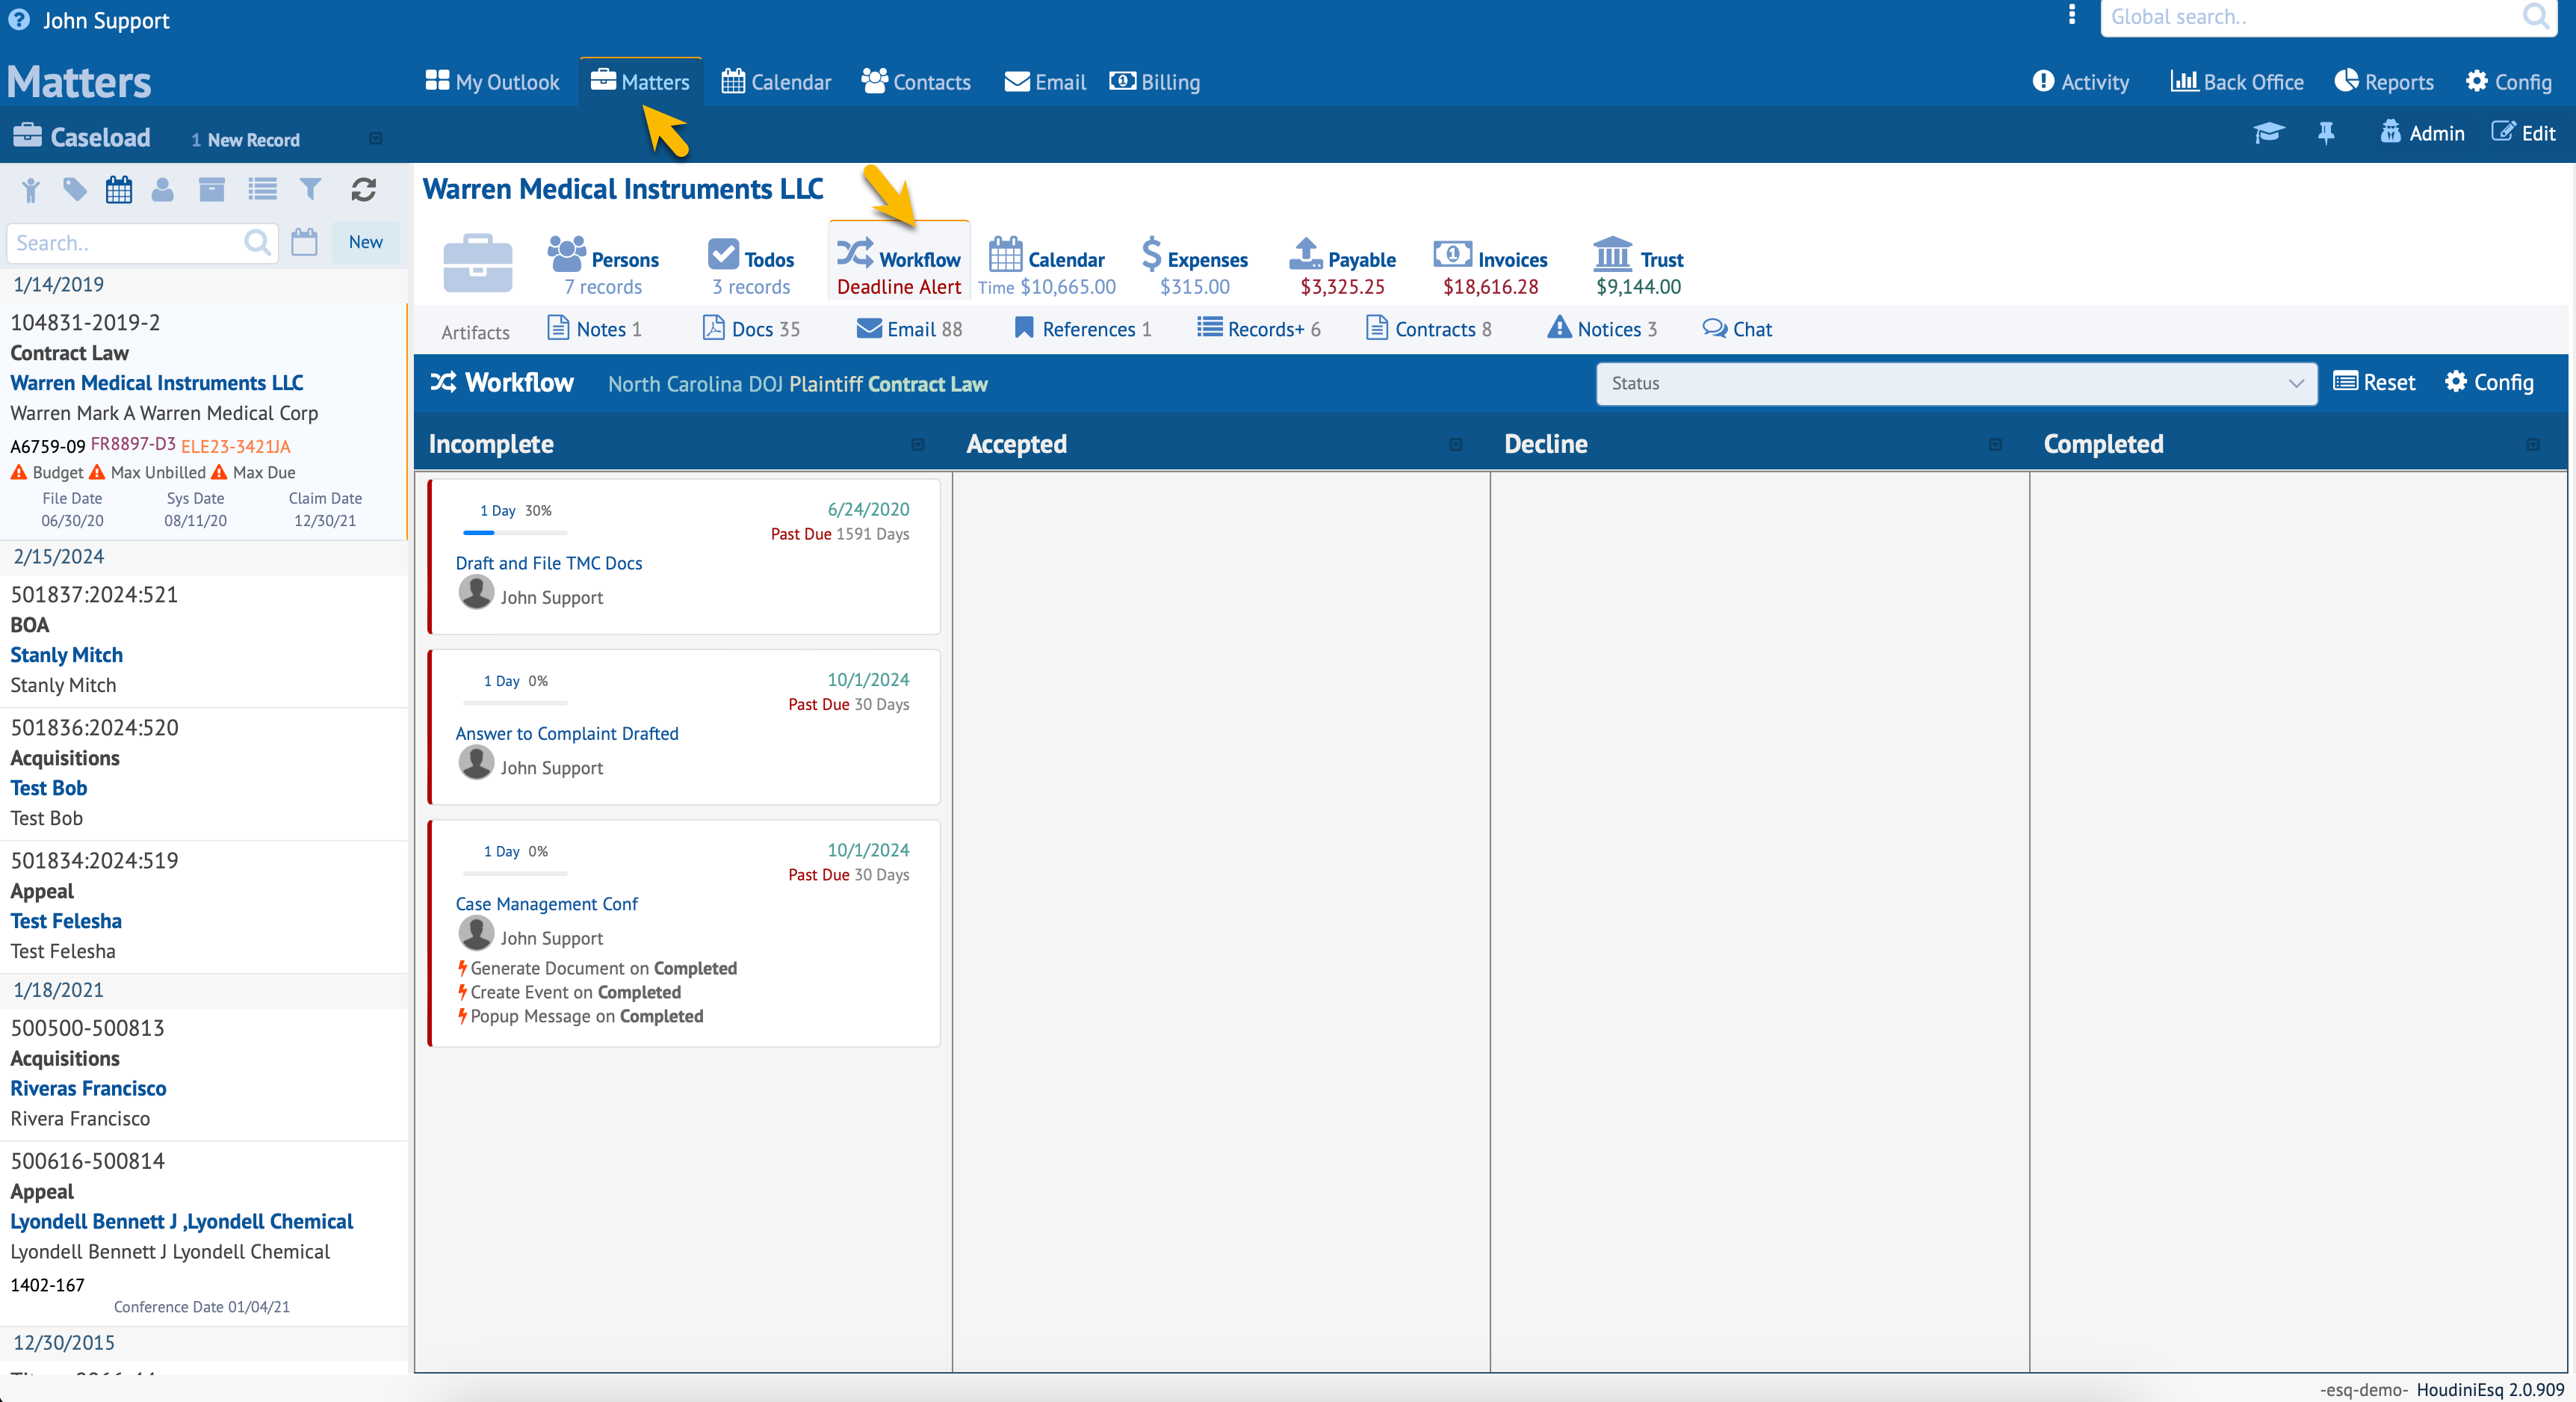
The Matter Workflow Tab
This is where the matter’s workflow tasks will be listed.

Best Practice Tip
Use a test matter for all your testing. Start by adding your firm as a contact record. Then create a matter linked to this contact record as a party to the matter. Give the matter a unique name so you can recall at will and with ease anytime you wish to try or test a feature. This provides an easy way to test functionality without the risk of altering an important record while experimenting.
The Workflow Kanban
This is where the matter’s workflow tasks will be listed. The Workflow Kanban is made up of vertical swim lanes. Each of these swim lanes represent a step, status or state defined by you.
Note If you have no workflows defined for the selected matter the Workflow Kanban will be empty. This image is provided so you can see what to expect once you create a workflow for a selected Practice Area.
To create or view all the workflows in the system click the Workflow Manager button in any Workflow Kanban.
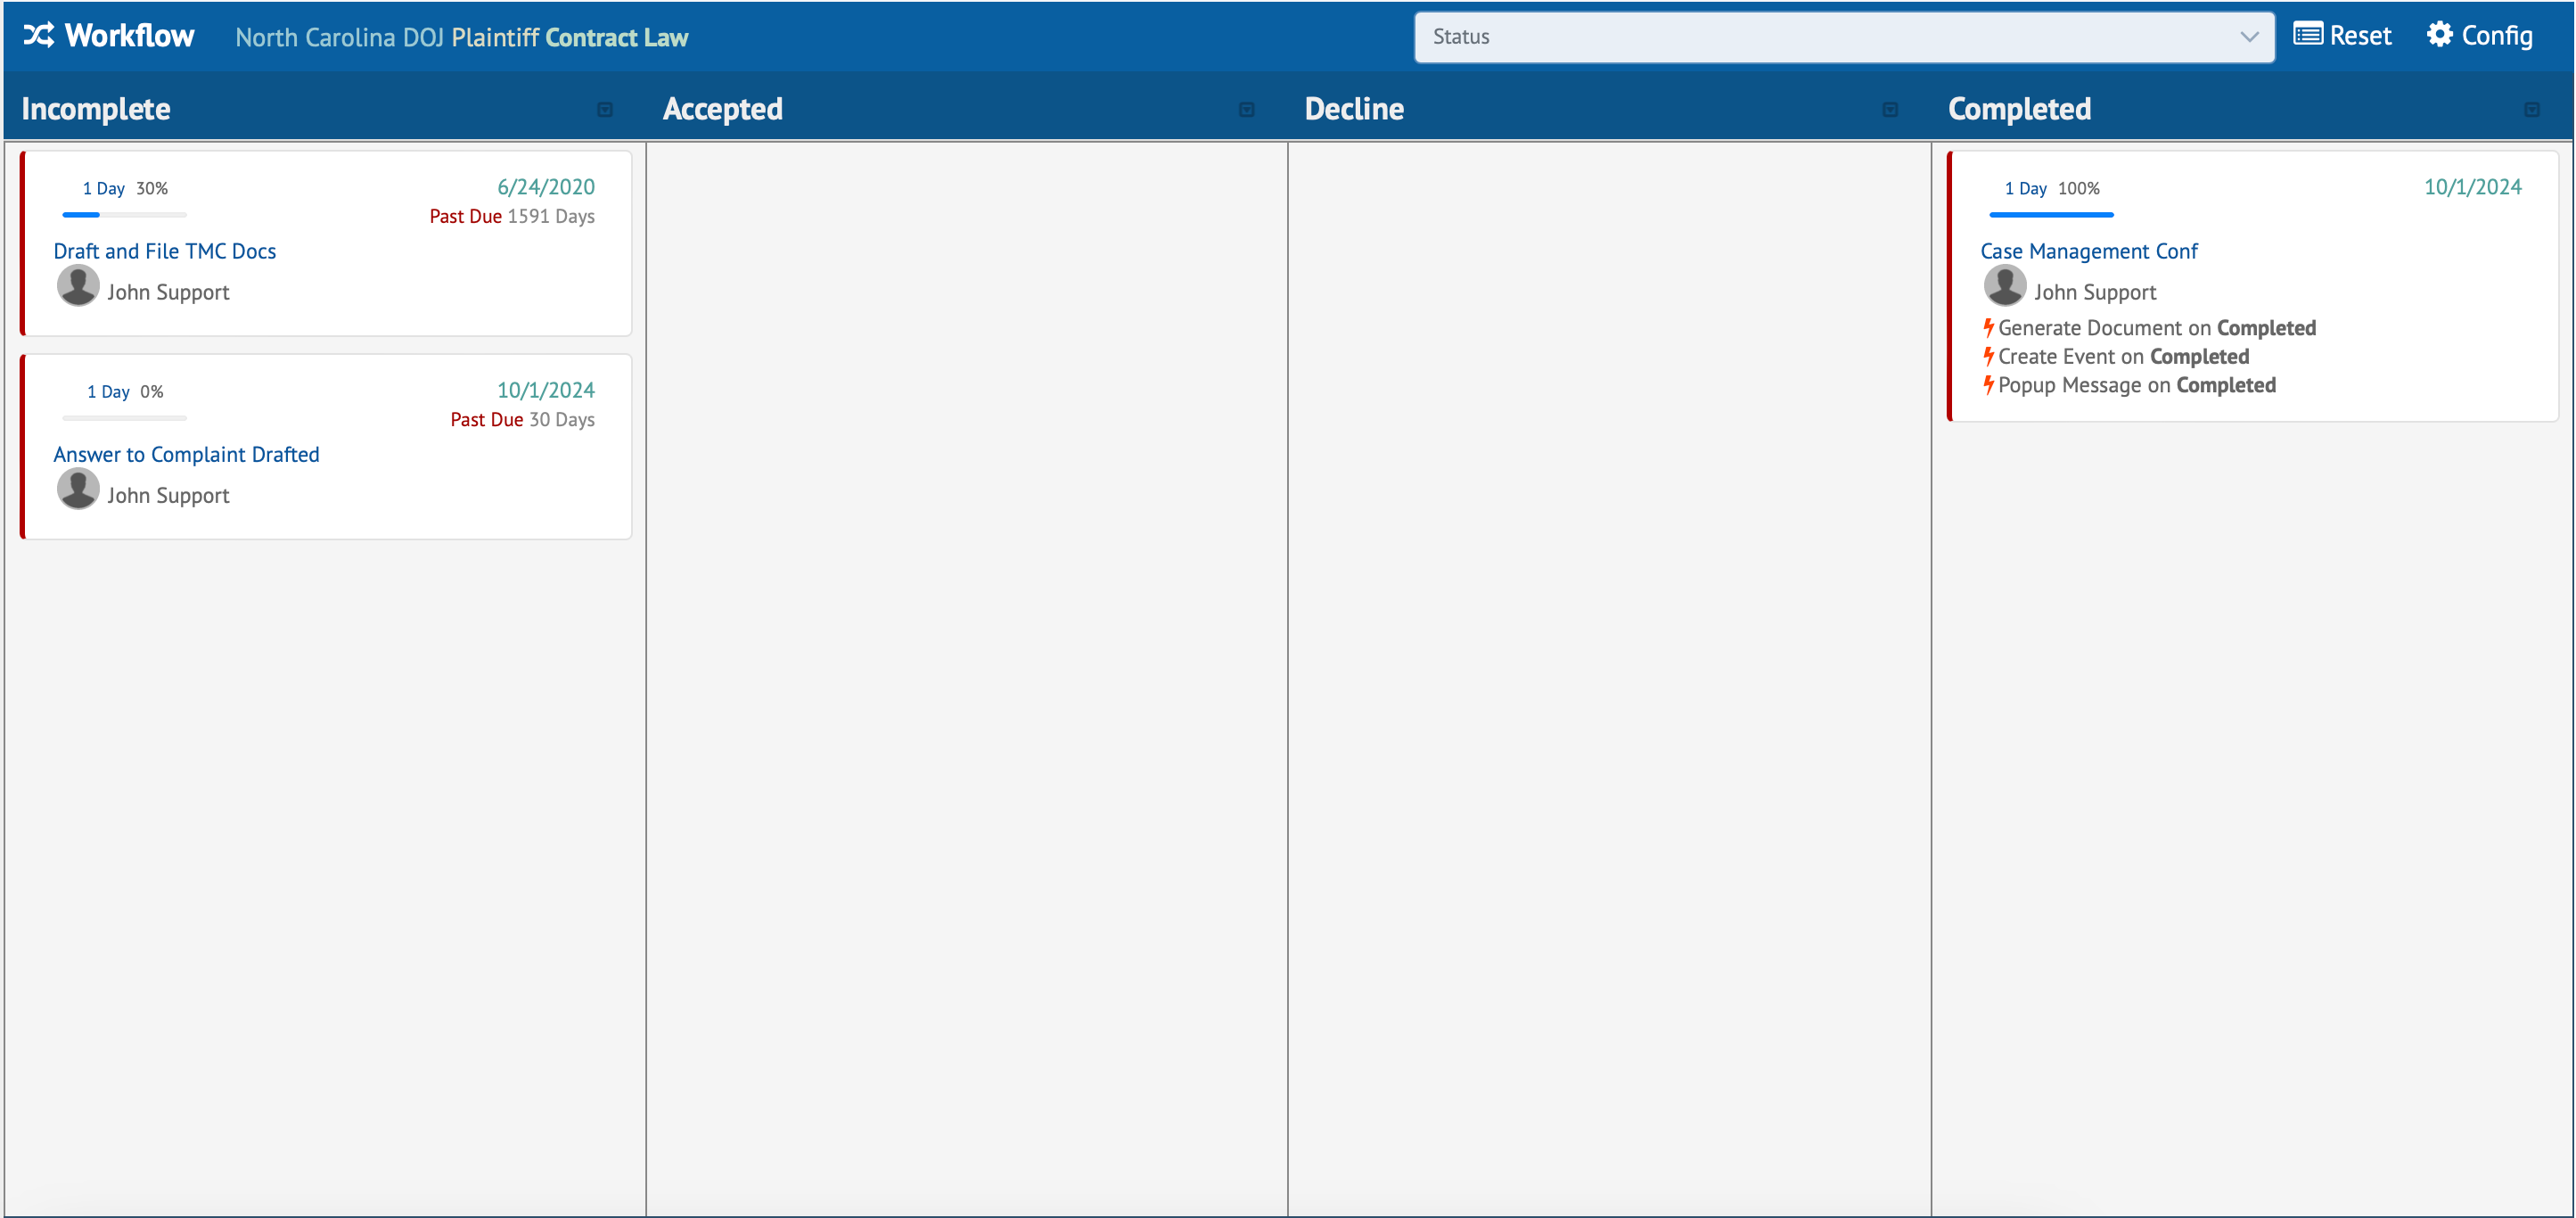
In the example screenshot above the Incomplete swim lane has two Tasks and the Completed swim lane has one Task. These Tasks can be dragged from swim lane to swim lane.
Every workflow must have an Incomplete step. HoudiniEsq adds this for you. You can name any of the other steps of the workflow to your liking.
In the above example Accepted, Declined and Completed are defined but can be named anything. What is important is that you use names that specify a step that has been completed.
How to use the Workflow Kanban
In general the user drags any Task in the Workflow Kanban to a different swim lane. This is a very efficient way to set the status or state of a Task. The Workflow Kanban allows a user to see the matter’s progress with just a glance.
Task are units of work that need to get done to advance a project to completion or advance a matter to closure. In this example “Case Management Conf” is a Task. This Task can be dragged into any swim lane you choose.
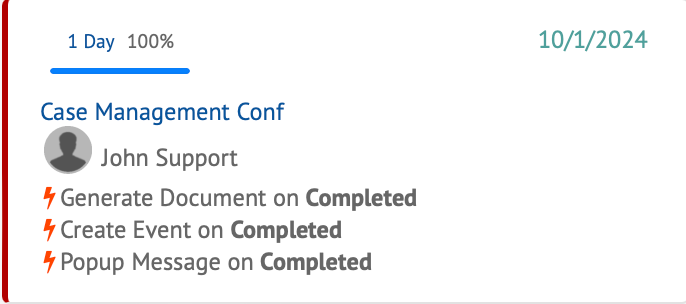
The Kanban is ideal for viewing a lot of information with little effort. A glance at the matter’s Workflow Kanban provides an overview of all the matters tasks that are currently active and their status. The above image is an example of a single Task/Todo. You can drag this Task anywhere in the Workflow Kanban optionally firing triggers and running Automation Routines.
Once a Task is dropped into a new swim lane a number of Automation Routines can be set to run e.g. Schedule an Event, create Todos, generate documents or correspondence and more.
The Workflow Template
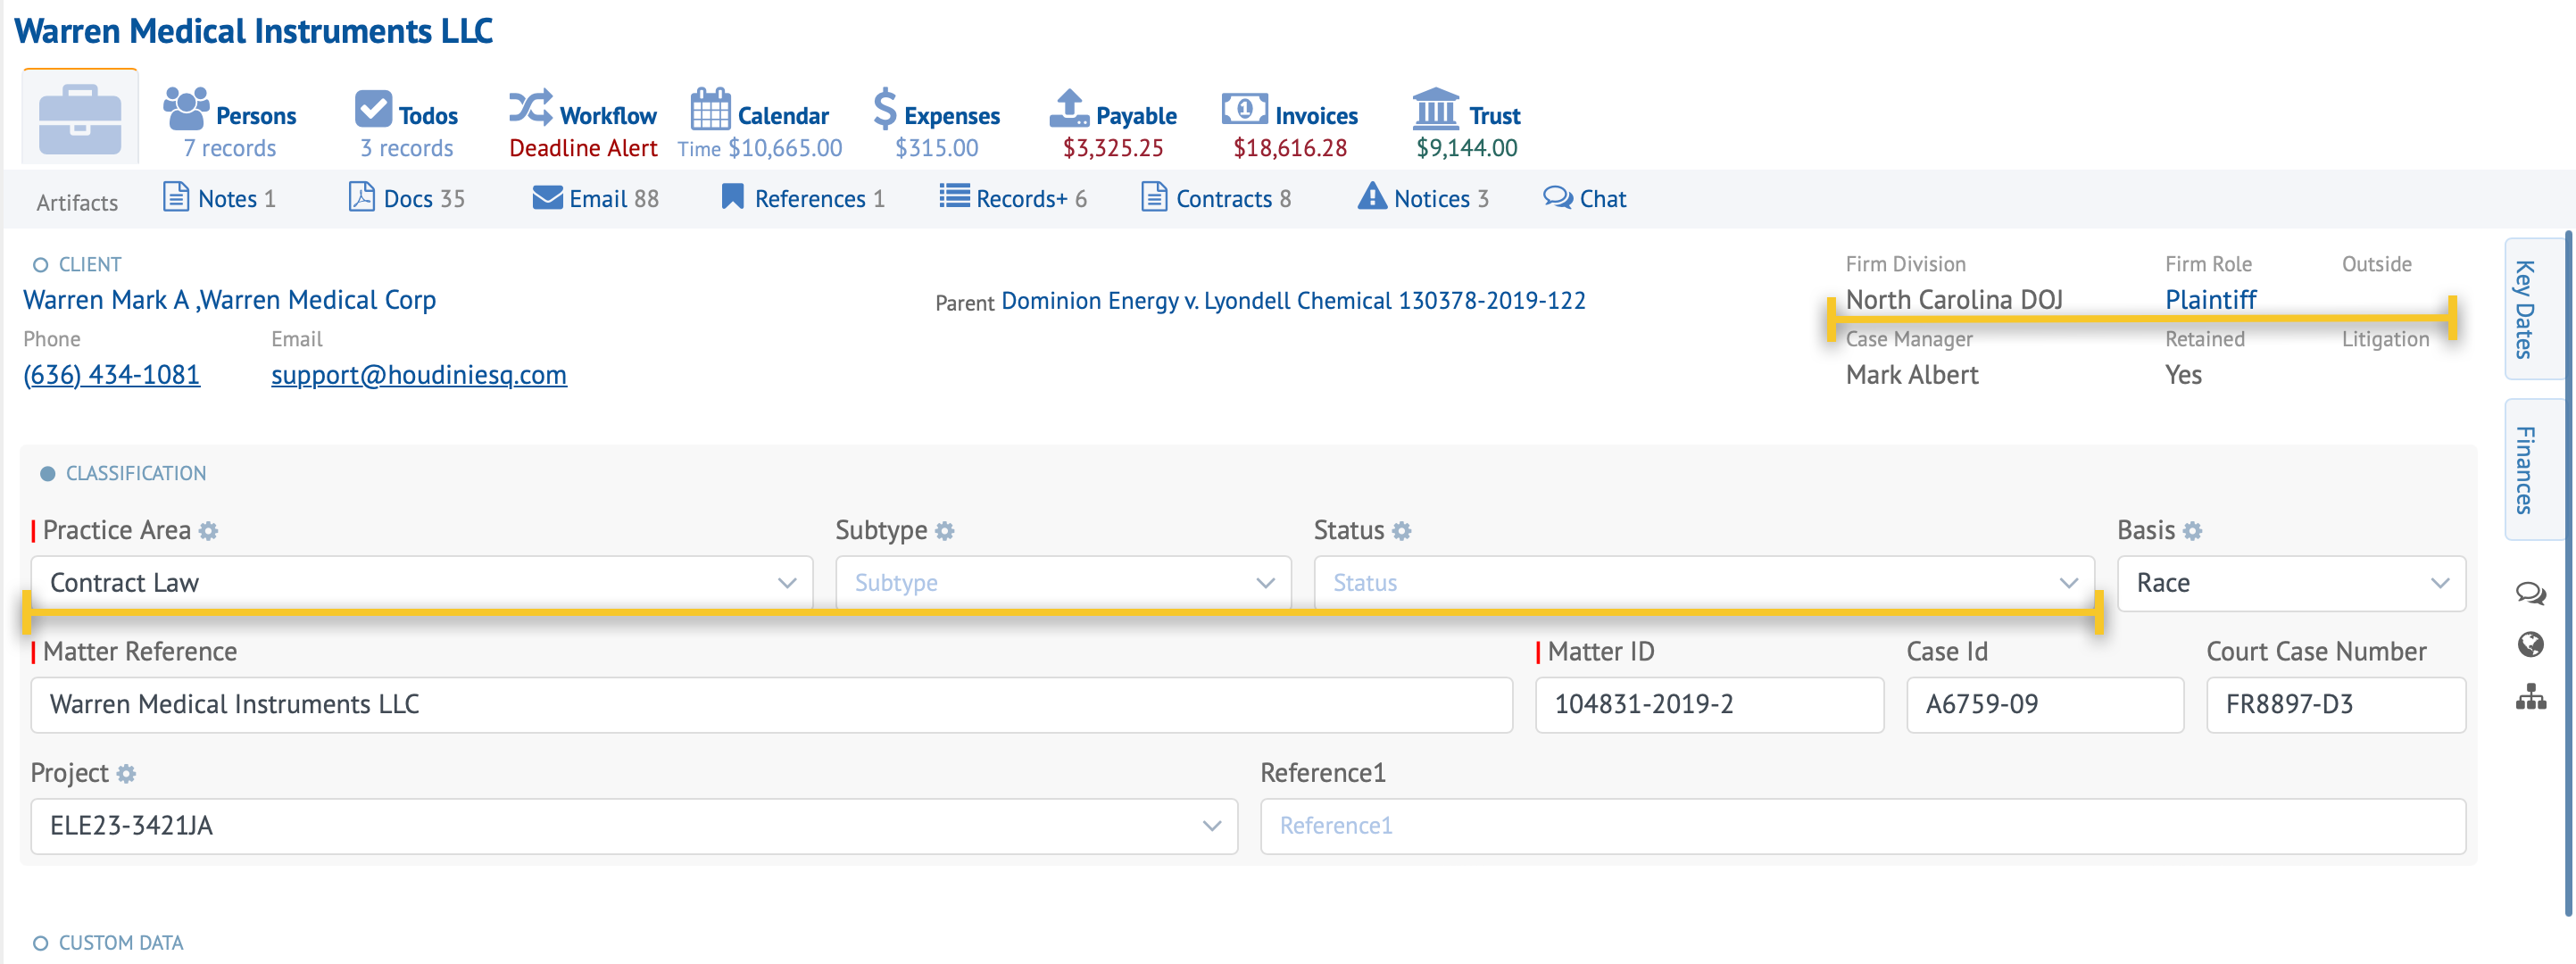
Each Workflow Template you create is assigned a matter classification called the workflow’s classification criteria. If the workflow and matter classifications match, the workflow is displayed in the Workflow Kanban of the matter.
If any of the Matter’s Classification fields are changed the Workflow Kanban will automatically load any workflow that matches the new classification, creates the required Tasks and optionally generates any required work products or correspondence.
The matter’s classification is important and defines the rules when the workflow is to be active and displayed. When you create a new workflow you must specify the exact classification to use which is a combination of the following matter classification fields.
1. Practice Area required
2. Subtype
3. Status
4. Division
5. Firm Role
6. Outside counsel (true/false)
7. In Litigation (true/false)
Matters can have multiple workflows assigned
You can create workflows that share task but do different things. For example we create a workflow for the Practice Area of Bankruptcy with tasks and automation that needs to be done for all bankruptcy matters. We then create two more workflows for Bankruptcy but with different subtypes.
For example, subtype Chapter 11 and Chapter 13. Each with its own tasks and automation. Whenever a matter is created for Bankruptcy the default tasks (todos) for Bankruptcy are created. When the Matter’s Subtype is changed to Chapter 11 or Chapter 13 then the additional Tasks are loaded in addition to all Task for Bankruptcy matters.
Workflow Automation
Where the rubber meets the road.
When a user moves a task to a different swim lane AKA step or status you can define a number of things to occur automatically.
You can notify staff with a chat message, email, or popup. You can generate one or more documents and place them into the Matter’s Docs tab or send a document to a user or anyone in your contacts list. You can pop up a message window, send a email to a client, schedule an event, create a todo, and more. You can even set matter field values including your own custom fields.
Workflow Chaining
If you change the Matter’s Classification, the Workflow Kanban will load a different Workflow if one exists. This means you can chain workflows by having one workflow change any of the matter’s classification fields thus loading a new Workflow.
To view a matter’s previous workflows and all the tasks assigned including their statuses, simply change any of the matter’s classification fields to match a previous classification.
Workflow Tasks are Todos
If you double click any workflow task it will open the Task under the Todo tab of the matter.
You can also view Workflow Task in the Todos tab of a Matter. Click the Show Workflow Tasks button in the toolbar of the Todos tab to see workflow generated Todos. They are identified by a crossing-arrow icon .i.e.
Draft and File TMC Docs.
The image below depicts the Todo tab of the matter showing Workflow Tasks which are in fact Todos.

The Workflow Kanban Toolbar
The Workflow Kanban toolbar displays the classification of the current matter. In the example image below, Division: “North Carolina DOJ”, Firm Role: “Plaintiff” and a Practice Area: “Contract Law”. This is important as it describes the active workflow being used in the Workflow Kanban.
If you are a member of the Admin group the Workflow Kanban toolbar displays three additional components.
1. The first is a Status drop-down. This enables you to set the current matter’s status quickly. Many firms add workflows linked to a matter’s status. This is for convenience to quickly set the matter status code. Any workflows with a matching classification will load and become active while viewing the Workflow tab. For example sally has just completed a final task of a workflow. She needs to advance the matter’s workflow so she selects a new status and done the new workflow is loaded creating all the required tasks. She never has to leave the the Workflow tab of the matter.

2. The next area is the Reset button. This enables you to reset all task to their initial state of Incomplete. Any artifacts created by a workflow such as sent email, documents etc remain intact. The triggers are reset and fire accordingly after using the Reset button.
Note If the workflow has automation that generates artifacts such as docs, the artifacts are recreated when the workflows fire their automation routines again. The workflow will not cleanup any duplicate artifacts (docs, notes, email, etc).
3. The last component and our favorite is the Workflow Manager button. This is where all the fun begins.
Click Workflow Manager in the Workflow Kanban titlebar to open the Workflow Manager.
Create a Workflow Template
The Workflow Template Manager
This screen lists all the Workflows Templates in the system. The Workflow Manager window is depicted below with a single Workflow Template in its list.
The list includes the matter classification criteria being used, the number of Steps and any Automation Routines assigned, etc.

The Workflow Manager can be filtered by workflows that are for Litigation, Automation Routines and Triggers assigned. Use the search field to find a Workflow Template or a Workflow Task.
Double click any item to edit an exsiting Workflow Template. To create a new Workflow Template click the New button in the Workflow Manager’s titlebar. This will open the Workflow Template panel.
It is important to note that Workflows are created from one or more Workflow Templates. We know that many matters of a practice area have similar or identical classifications so we take a create once apply to many approach. By creating a Workflow Template and applying it to any matters that match its Classification Criteria, managing your workflows is easy peasy.
Creating a Workflow Template
When you click New in the Workflow Manager’s titlebar the Workflow Manager’s Template window appears as depicted below.
We create a workflow template because workflows only need to be defined once but are applied to one or more matters if the criteria is met. The classification criteria of the workflow must match the selected matter’s classification to become active. This is why you can configure workflows from any matter’s workflow tab. Not just the matter you created the Workflow from.
The panel is broken into three sections. 1. Criteria, 2. Steps, and 3. Tasks
1. Criteria
This is where we set the criteria for the workflow’s classification filter.
2. Steps
Set the required Steps needed to complete tasks. Each Workflow can have a maximum of 10 steps. Technically you can add an unlimited number of steps if you chain your workflows but more on that later.
3. Tasks
Add any Tasks that represent one or more units of work or one or more work products.
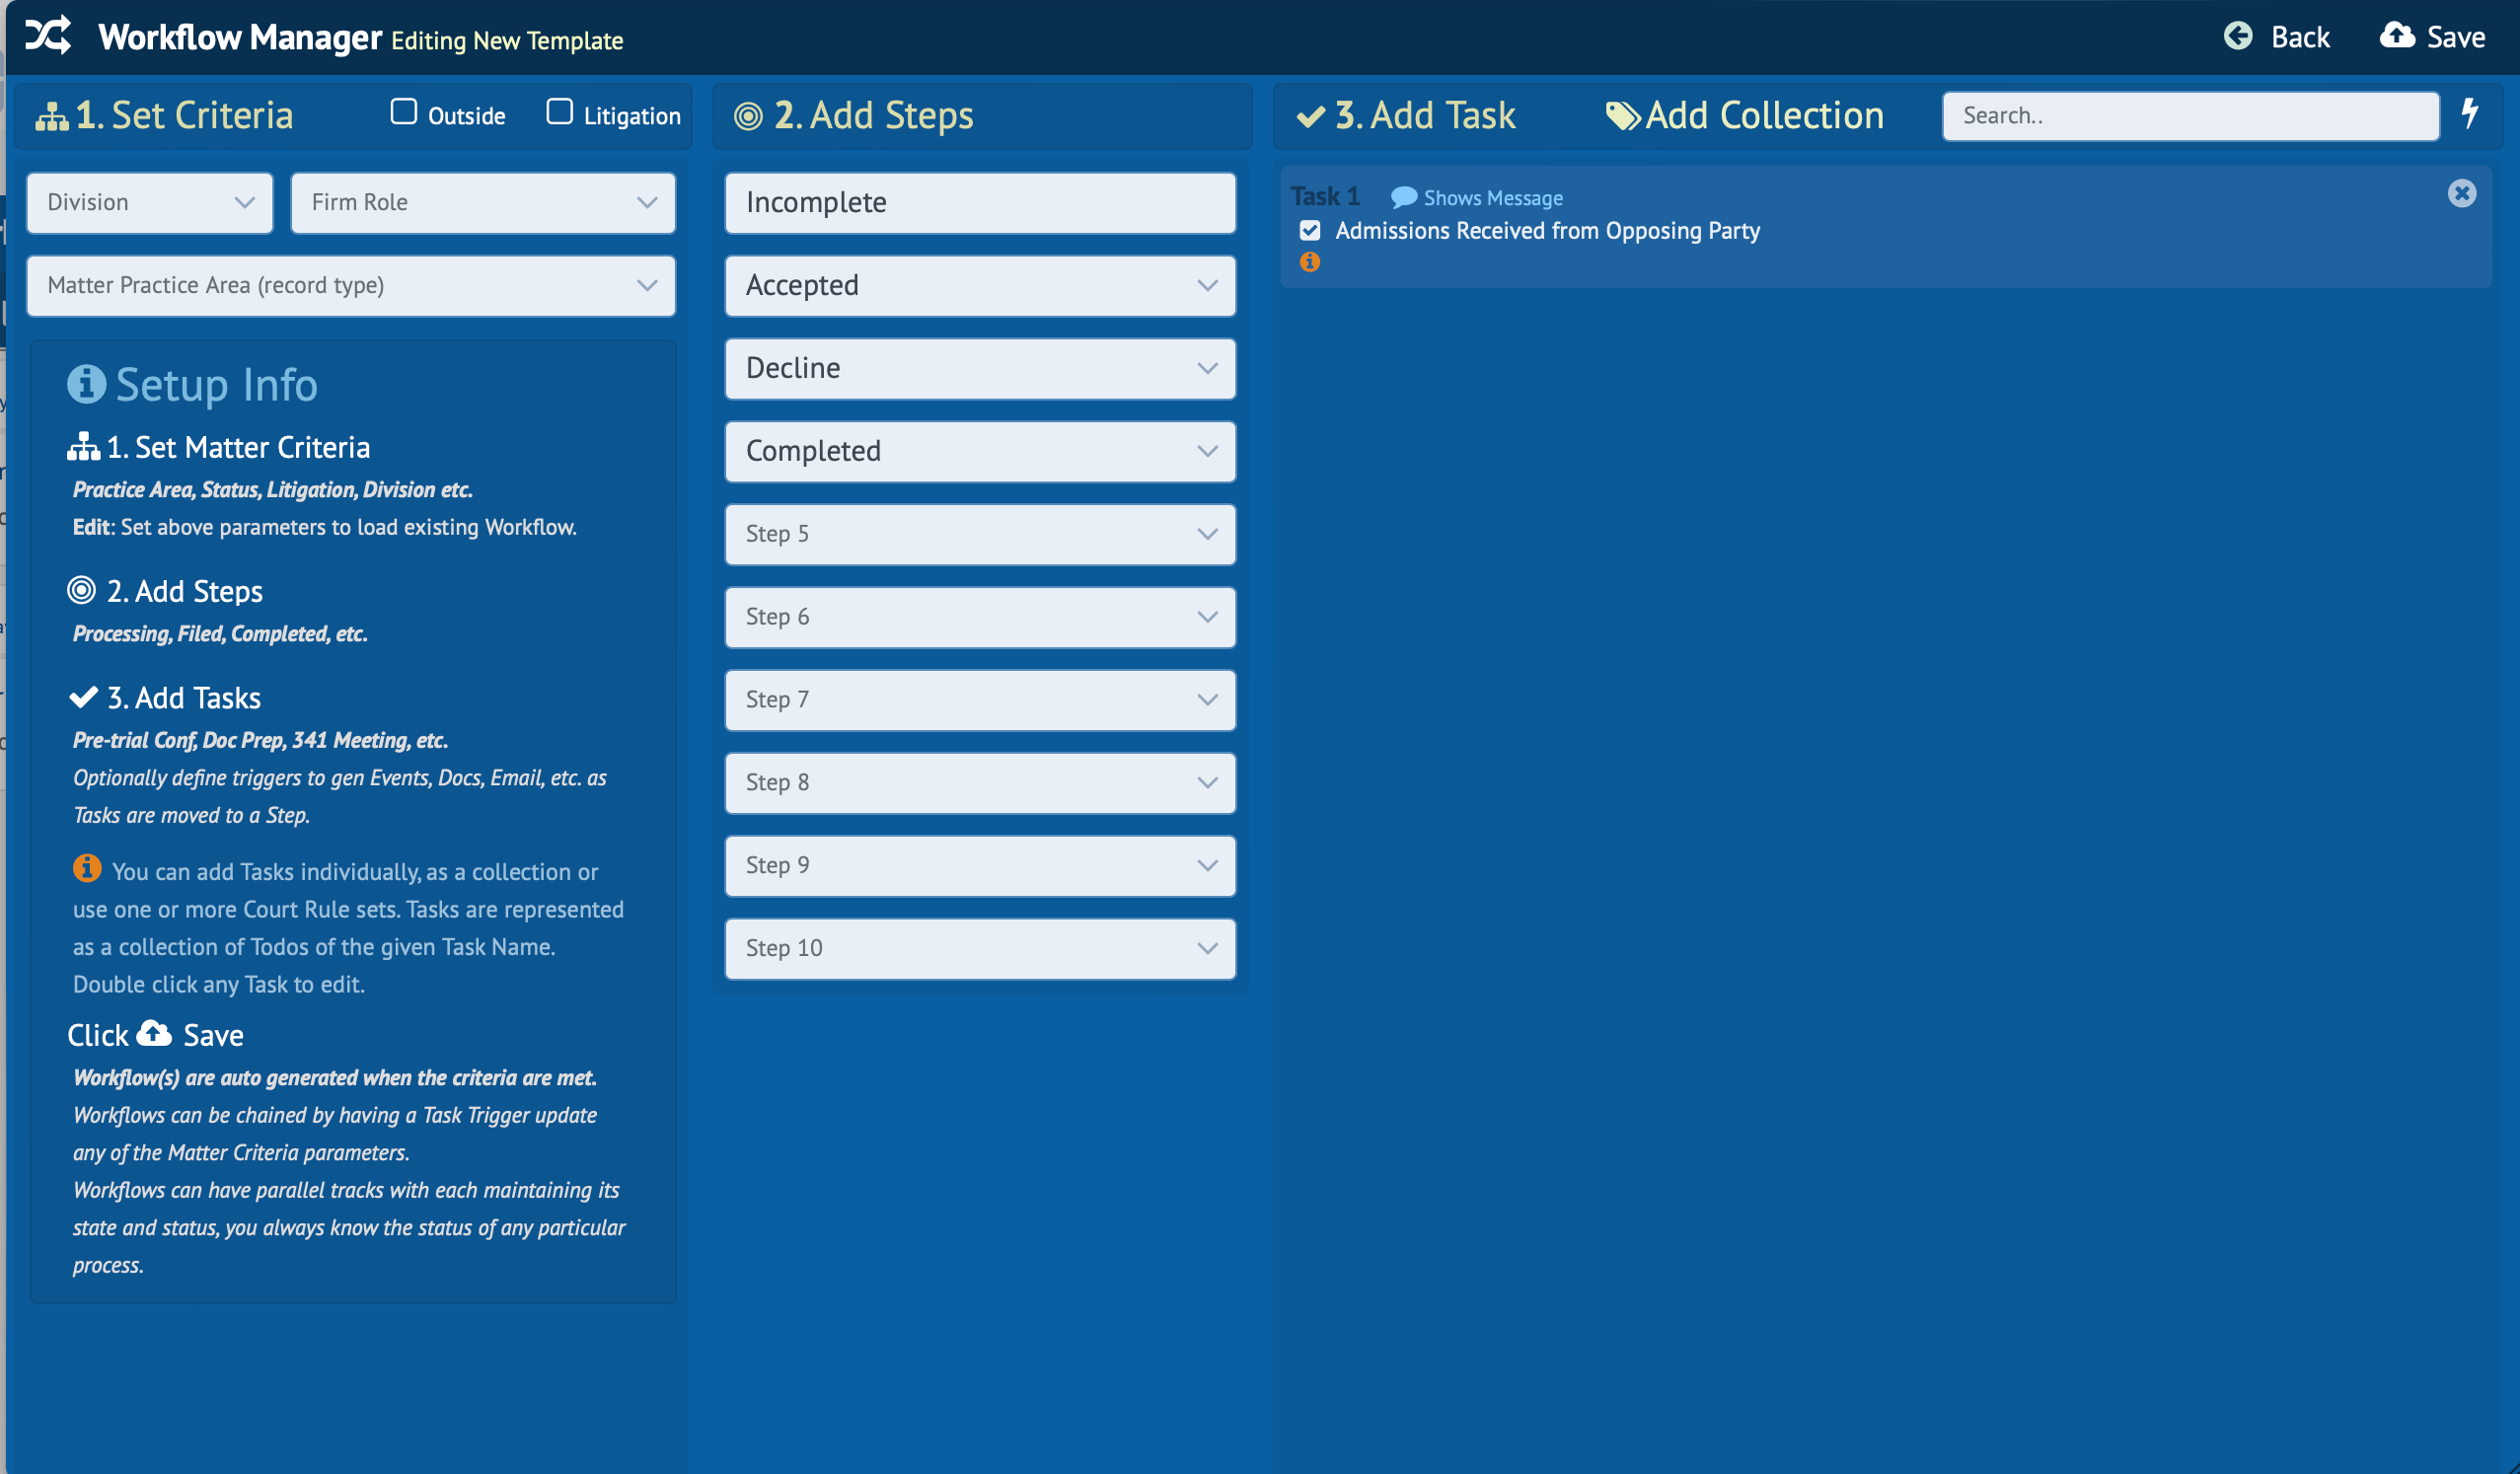
IMPORTANT Although you can create a workflow definition under any matter. Remember that the classification must match exactly for a workflow to appear under the selected matter’s Workflow tab.
Step 1 Set the Workflow’s Classification Criteria.
You have only one required parameter which is the Practice Area followed by six optional parameters Subtype, Status, Division, Firm Role, Outside counsel, and Litigation. These are the very same as the Matter form Classification fields. Litigation is a special field. If you check the Litigation checkbox a Litigation Status dropdown appears and the Practice Area, Subtype and Status fields are hidden. You should only use the Litigation workflow for Litigation matters as they typically can have specialized unique statuses.
Note The Subtype and Status fields are hidden until a Practice Area is selected.
Step 2 Set the number of Steps in this Workflow.
There can only be a max of 10 steps in a Workflow. Step 1 always has to be Incomplete. HoudiniEsq does this for you. You can name the Steps 2-10 anything you like.
Step 3 Add Tasks that must be completed.
There is no limit to the number of Tasks a Workflow can create and they can be anything you choose.
These Task you create can have triggers applied that execute automation routines such as send a email, generate a document, and more when a Task is moved to a new Workflow Kanban swim lane. Moving a Workflow Task to a new swim lane is akin to changing the Task’s Status.
Remember Tasks are nothing more than Todos created by a Workflow.
TIP It is best practice to create a workflow that will hold all the common task that needs to be completed for the given Practice Area regardless of Subtype or Status. Leave these two fields blank. Then add workflows for the same Practice Area but use a Subtype as additional criteria and add only those tasks that are specific to the selected Subtype. An example used previously was the Practice Area of Bankruptcy. We all know there are different types of bankruptcies called Subtypes such as Chapter 11 and Chapter13.
Using the Bankruptcy example above, every bankruptcy matter will share common Workflow Tasks. However, if the matter’s Subtype is Changed to Chapter 11 then the Bankruptcy Workflow Task is loaded as well as the Chapter 11 Workflow Tasks. This is just one of many powerful features of using HoudiniEsq Workflow. Such as Chaining Workflows.
Chaining Workflows. You can further add a Status to the workflow’s criteria so when the matter’s status is changed the workflow is changed to reflect the matter’s new Classification. This means you can Chain Workflows together by simply adding a workflow automation routine to change the status of the selected matter thus loading a new Workflow that matches the matter’s new Classification.
Creating Workflow Tasks
Workflow Tasks are added to the Workflow Template in area 3. Add Task of the Workflow Template panel.
Click the Add Task at the top of the area. This will open the Workflow Task form.
You can quickly add a collection of Tasks with the Add Collection button. Click the button for additional info.

The Workflow Task Form
The Workflow Task form is where we define a single Task and its Automation Routines.
A Task describes a Todo record that will be created when this workflow’s classification criteria matches a matter’s classification.
The Task form below is where you define the Todo that will be created in the Workflow Kanban. These Todos are also visible in the matter’s Todo tab once created.
A Workflow Task can represent a simple Todo or it can represent a complex process that has several parts. An example of a Step is Incomplete, Filed, Completed, etc. An example of a Task is Intake, Petition Prep, Deposition, Hearing etc. Think Todos.
IMPORTANT Please carefully read the text at the top of the form and all of its pages for tips and hints. Reading is fundamental.
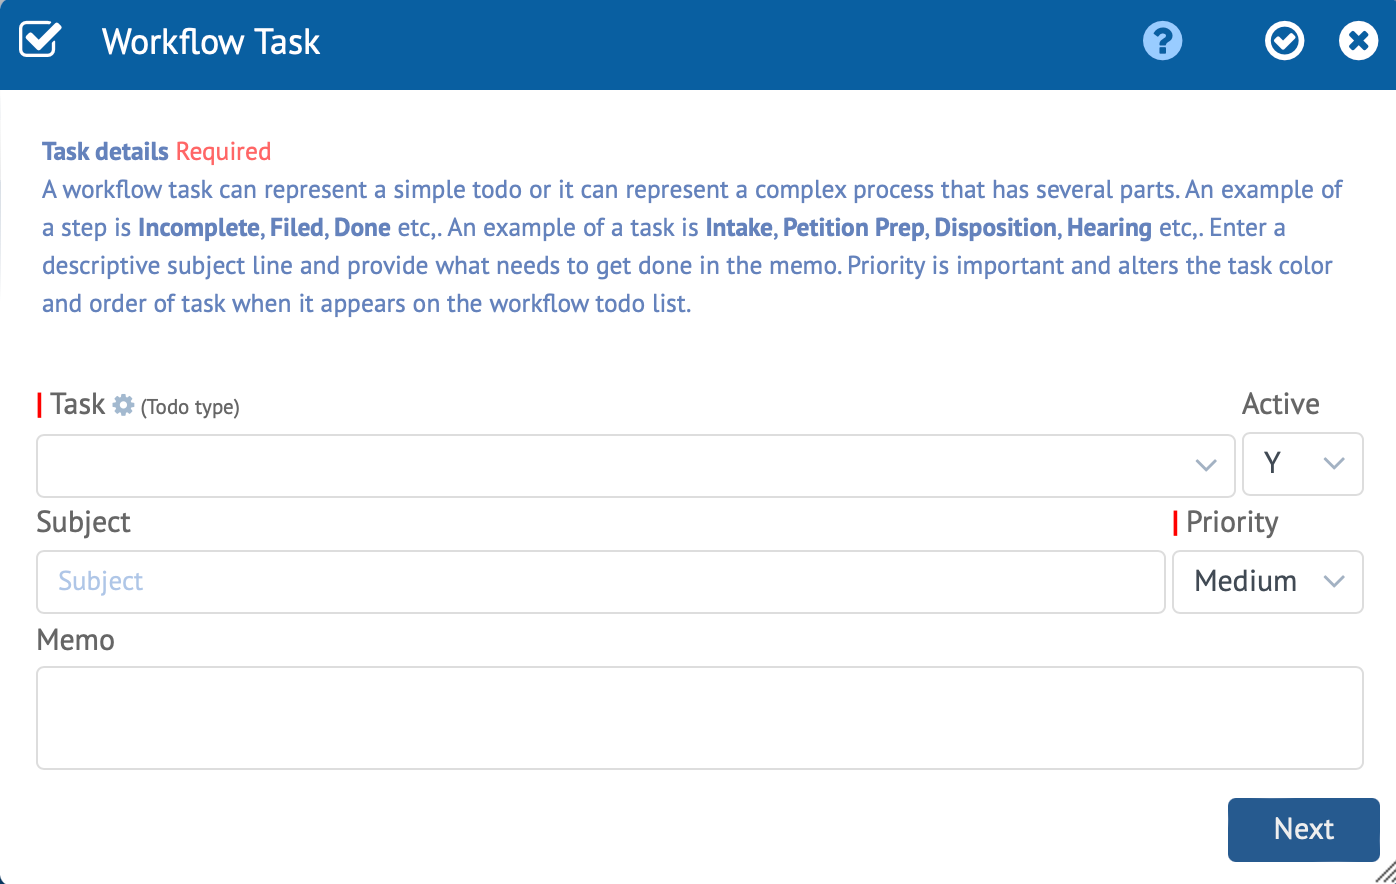
The Workflow Task Form Details tab is depicted above. Click the Next button to continue.
Details Tab
The Workflow Task Form Details Tab has five fields.
Use the Details tab of the form to describe the Todo to create. This will create the draggable Task on the Matter Kanban to represent a unit of work to be done, a Todo.
Task
Task is a dropdown of Todo types. Remember, Tasks are Todos created by a Workflow. So this Task will be used to create a Todo.
Important If you are a member of the Admin group you can edit or add the values in the Task dropdown. To edit simply select from the dropdown and press the enter key. To insert a new value simply type a new value and hit the enter key.
Active
To disable a Workflow Task set this value to N (false).
Subject
Task Description. The Subject is the very same as the Task Description field on Todos.
Priority
Set this value to the priority you prefer for this Task. Priority is important as it alters the task color and order of the Tasks in list.
Memo
Any notes. It is good practice to explain the Todos purpose if the Task name is not descriptive.
Directions
Select or add a Task name. Enter a Task description in the Subject field e.g. “Send Engagement Letter”. Select the desired Priority.
Click the Next button to continue.
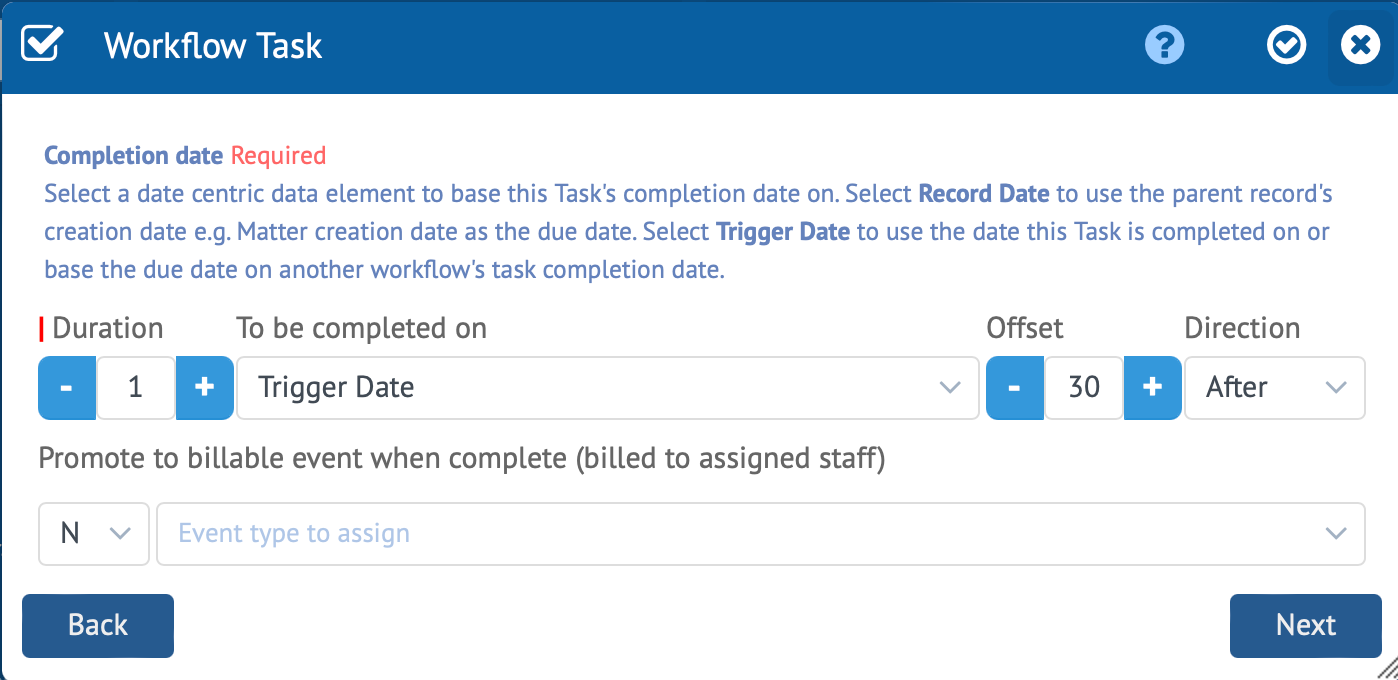
The Workflow Task Form Completion Date tab is depicted above. Click the Next button to continue.
Completion Date Tab
The Workflow Task Form Completion Date Tab has six fields.
Use the Completion Date tab of the form to describe how the Todo is to be dated when it is created.
Duration
Task duration in days. How long should this task take to complete.
To be completed on
This is the date centric data element to use when calculating this Task’s Completion Date. Your choices are listed below.
Intake Date
Use the date the matter’s intake was completed to calculate this Task’s Completion Date.
Record Creation Date
Use the date the Matter was created to calculate this Task’s Completion Date.
Trial Date
Use the Matter’s Trial date to calculate this Task’s Completion Date.
Trigger Date
Use the date this Task was created to calculate this Task’s Completion Date.
User Key Date 1 thru 10
Use any of the user defined Key Dates of the Matter to calculate this Task’s Completion Date.
Workflow Task Due, Start and Completion Dates
Use the Workflow Record dates to calculate this Task’s Completion Date.
Offset
The number of days used to offset from the start date.
Direction
This is the direction the offset is to take when calculating a date. Set this value to either Before or After.
Promote to Billable Event
Selecting Y will create a Billable Event when the Task is completed.
Event Type to assign
If you select Y in the Promote to Billable Event then select an Event type to create from the list.
Directions
Set the Duration, Offset and Direction for the date calculation. Select the date centric data element to use for the completion date calculation.
Click the Next button to continue.
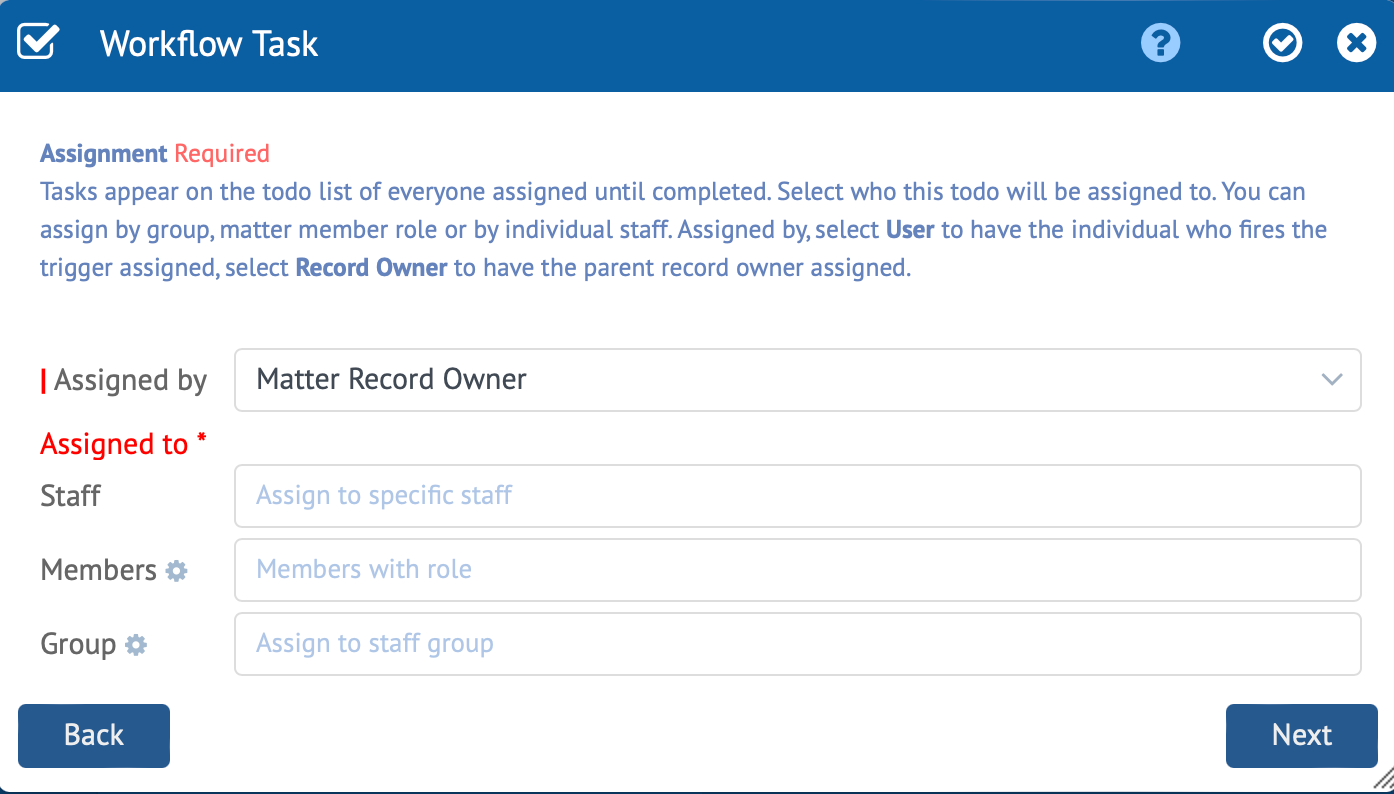
The Workflow Task Form Assignment tab is depicted above. Click the Next button to continue.
Assignment Tab
The Workflow Task Form Assignment Tab has four fields.
Use the Assignment tab of the form to describe who is to be assigned to the Todo when created.
Assigned by
Use this dropdown to select who to Assign this Task to. You have the following choices. You can select a specific Staff Member or you can select either User or Matter Record Owner to be assigned this Task.
User is the individual who completes or fires this Task’s Automation Routines. Matter Record Owner is obviously the assigned owner of the matter record.
Assigned to
Use one of three options to Assign this Task to when the record is created. Here are your three options.
Staff
Use this dropdown to assign to specific staff.
Members (Staff Role)
Use this dropdown to assign to staff members with a specific role, e.g. Case Manager.
Group
Use this dropdown to assign to staff members who are specific group members, e.g. Billing Clerk.
Directions
Set who will be the Assignor. Set who will be the Assignee.
Click the Next button to continue.
Did you know?
A record’s Owner and Creator or Assignee and Assignor are considered distinct but can refer to a single staff member. However, this isn’t always true. For example Sally schedules staff calendars. She can assign ownership to another staff member e.g. Sally schedules an event for Robin. Robin is the Owner and Sally is the Creator.
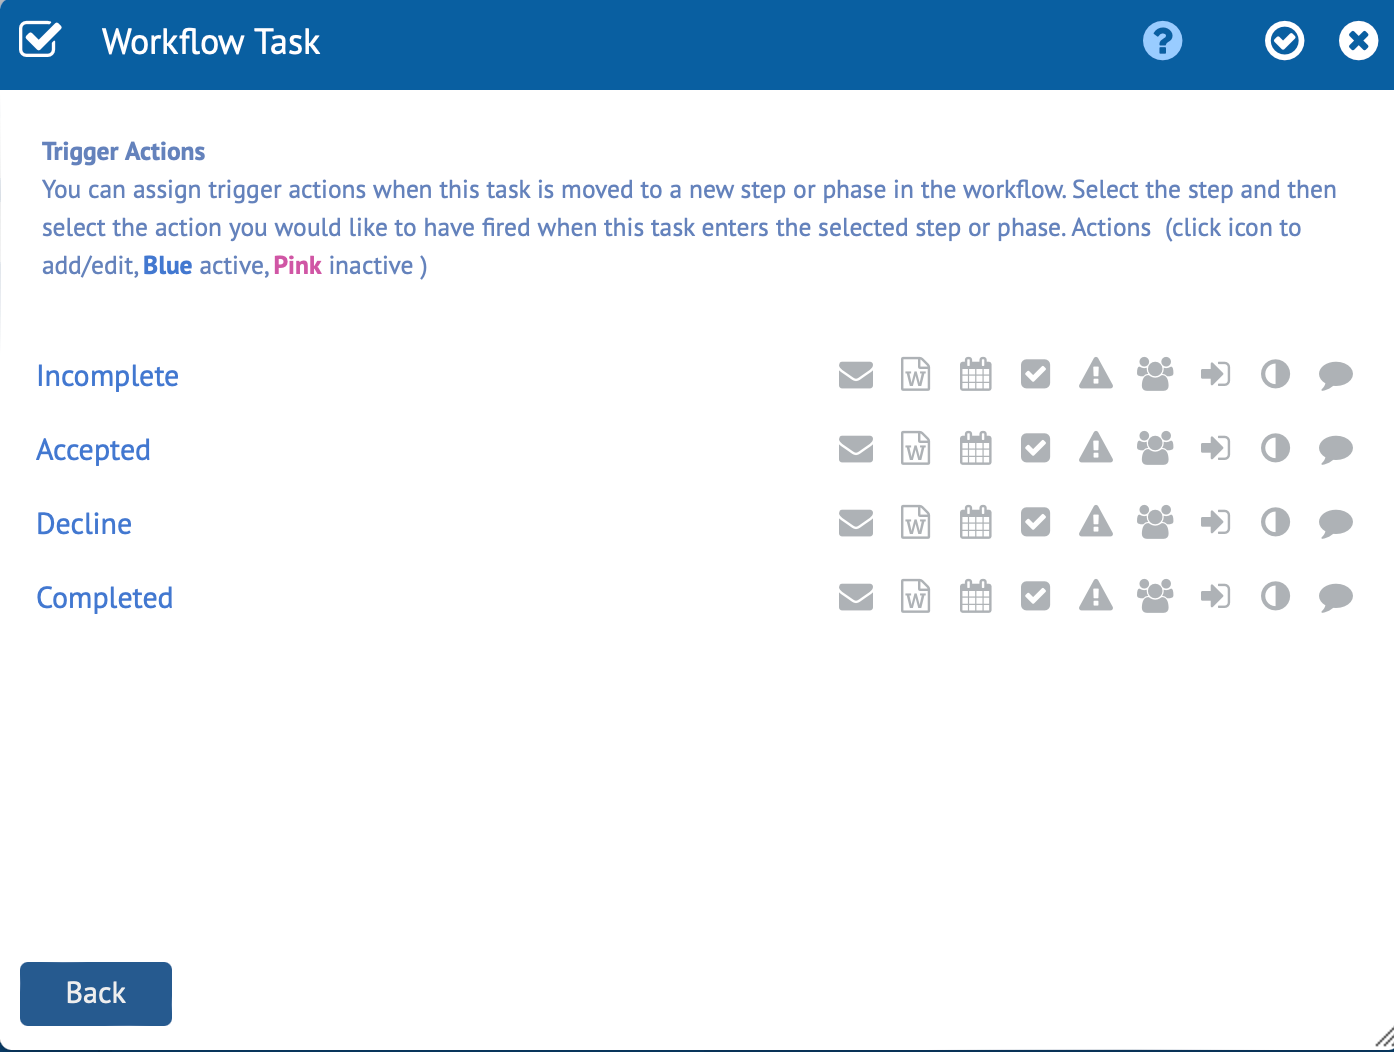
The Workflow Task Form Trigger Actions tab is depicted above. Click the Back button to return to the Completion Date tab.
Trigger Actions Tab
The Workflow Task Form Trigger Actions Tab has no fields but a clickable matrix of Workflow Automation Routines.
Use the Trigger Actions tab of the form to describe what Automation Routines to execute when a user moves a Task to a new Step, i.e. dragging a Task to a new swim lane in the Workflow Kanban.
Important Anytime a Task’s step changes it is called a Trigger. An Action is the Automation Routine to execute.
For example Send a Email whenever this Task is moved to the Completed Step.
This tab is dynamic and lists the Steps you defined at the very beginning of this lesson. These are your Triggers and are listed on the left of the panel. Incomplete is always present. Use this Trigger to execute one or more Automation Routines upon the Todos creation on the Workflow Kanban. Otherwise any other trigger only fires when the Task is moved to a new Step.
To create a Workflow Task Trigger Action click the relative icon that represents the Automation Routine to run. You have the following nine choices. Clicking any will open the appropriate wizard to define the routines parameters. Each wizard has onscreen guidance and tips.
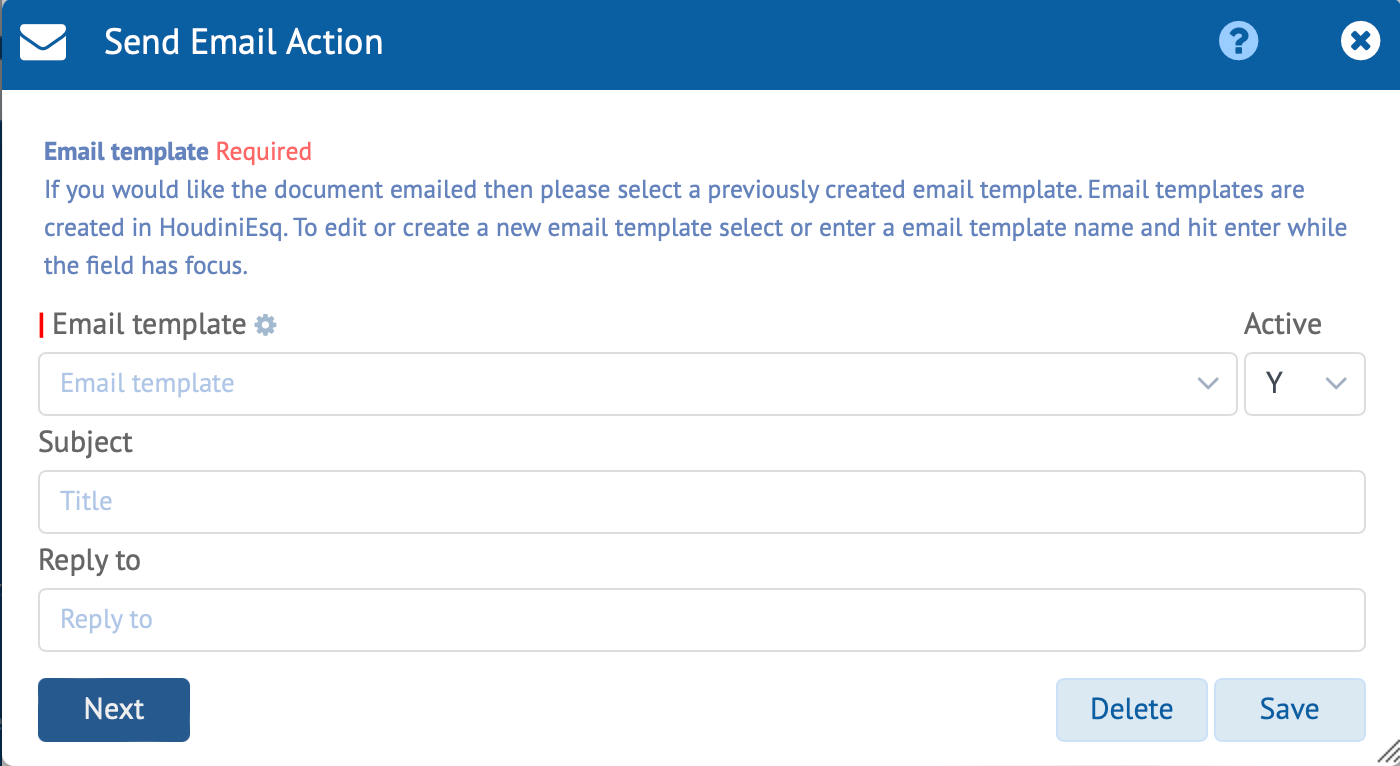
Send a Email
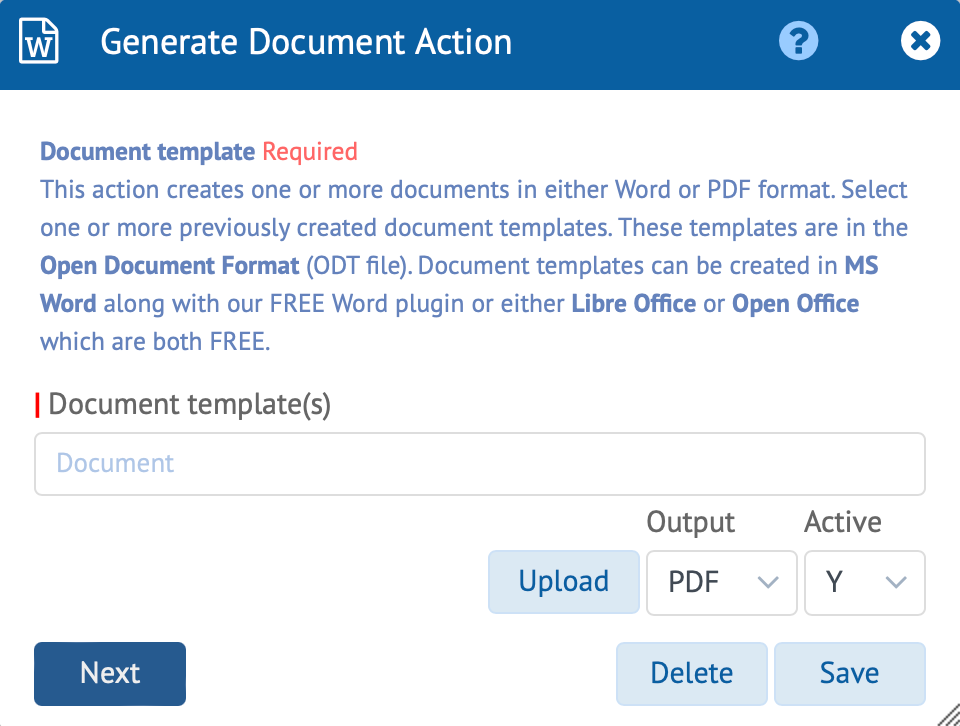
Generate Document ( Word, PDF, ODT, TXT )
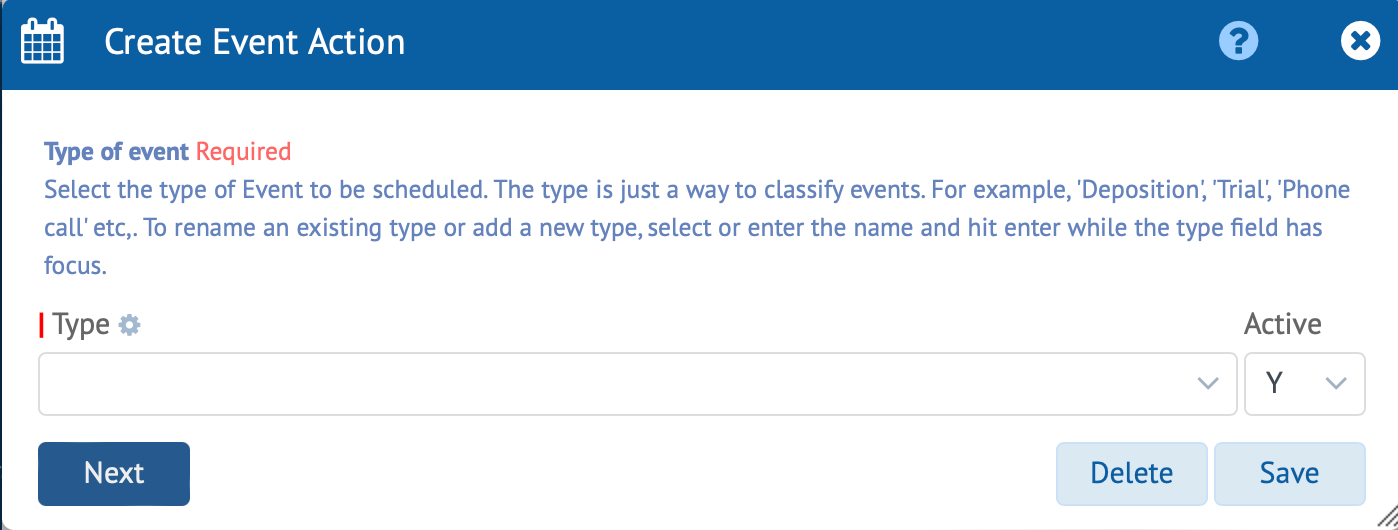
Calendar an Event
Create a Todo
Notify Staff
Assign Group to Record
Set a Field Value
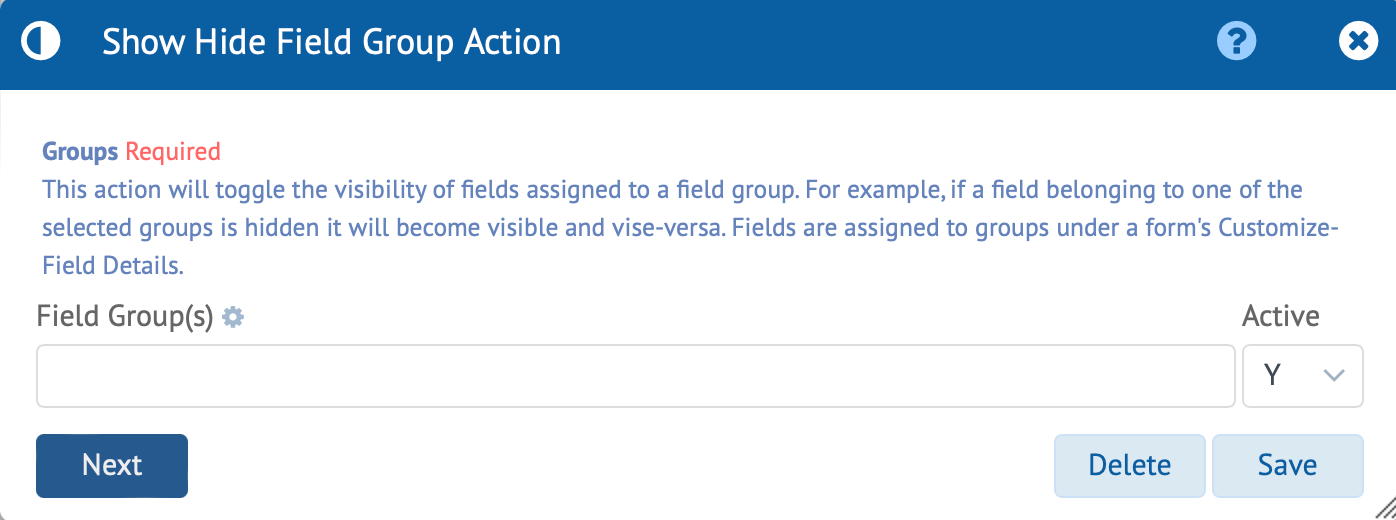
Show Hide Fields
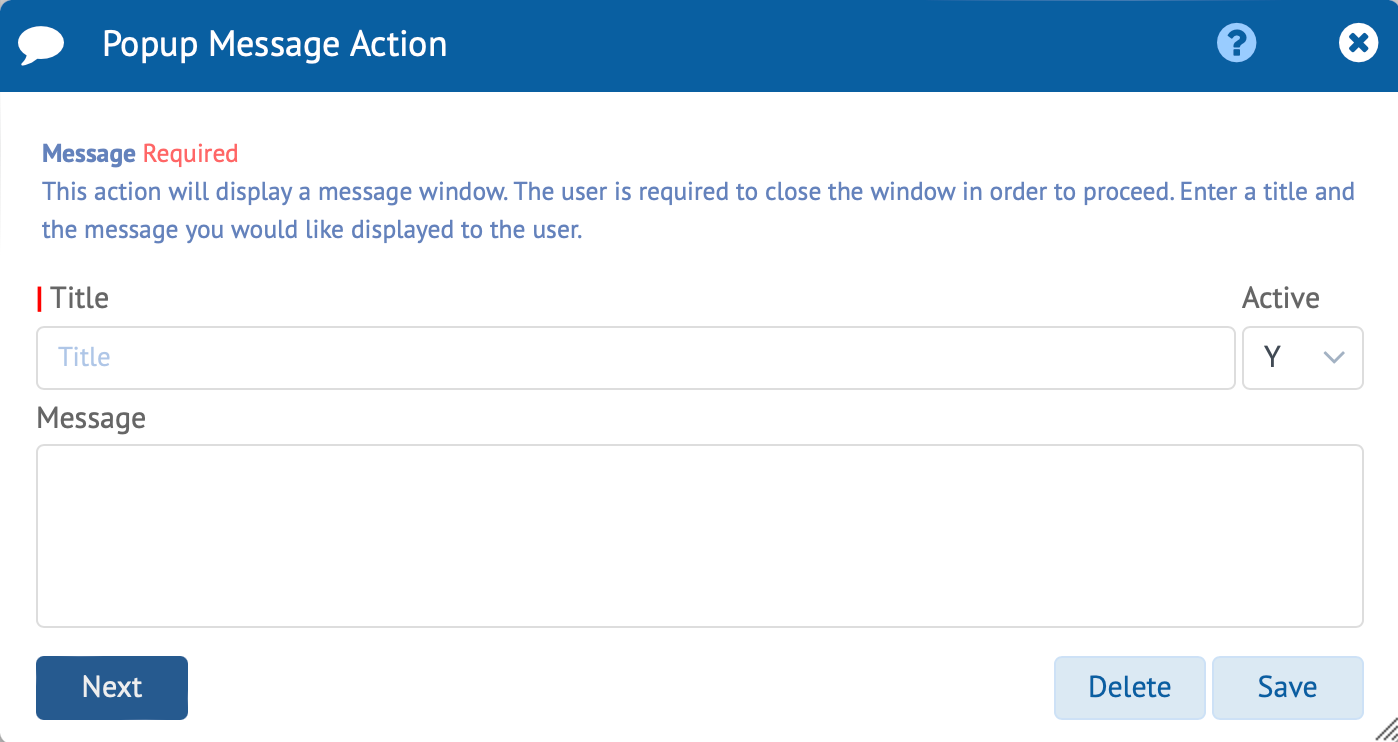
Display Popup Message
Directions
Click any of the Automation Routine icons of any Trigger on the left, follow the onscreen wizard’s instructions. Repeat.
When done you will be returned to the Trigger Actions tab.
Continue adding Automation Routines to your Workflow Task. When satisfied with the results Click the Save icon in the Workflow Task window titlebar. Your Task is added to the Workflow Template.
The 9 Automation Routine Forms
The nine Automation Routine forms are depicted below. Follow the onscreen instruction in each wizard click Save and repeat as you like.
Send a Email
Generate a Document
Schedule an Event
Create a Todo
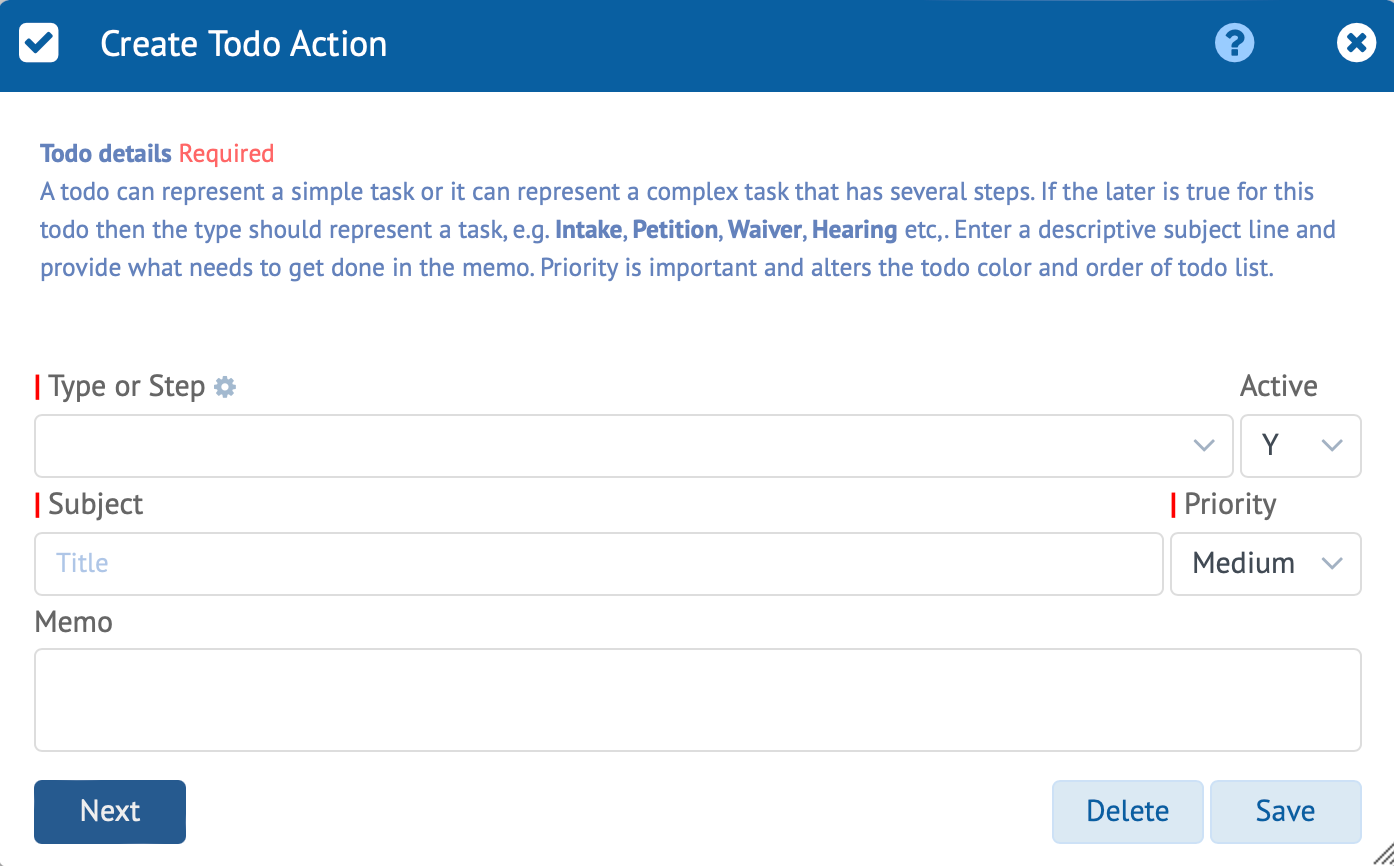
Notify a Staff Member
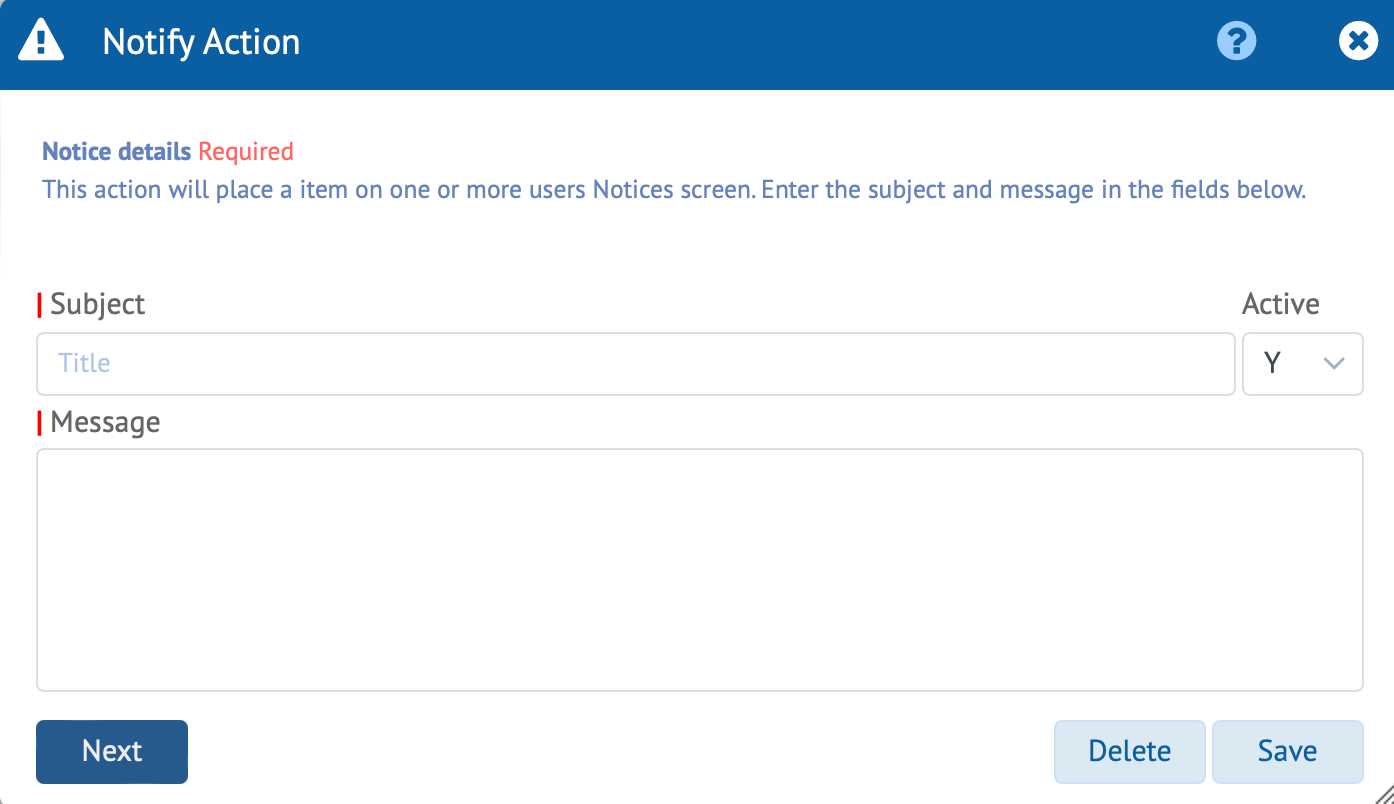
Assign Group to Record
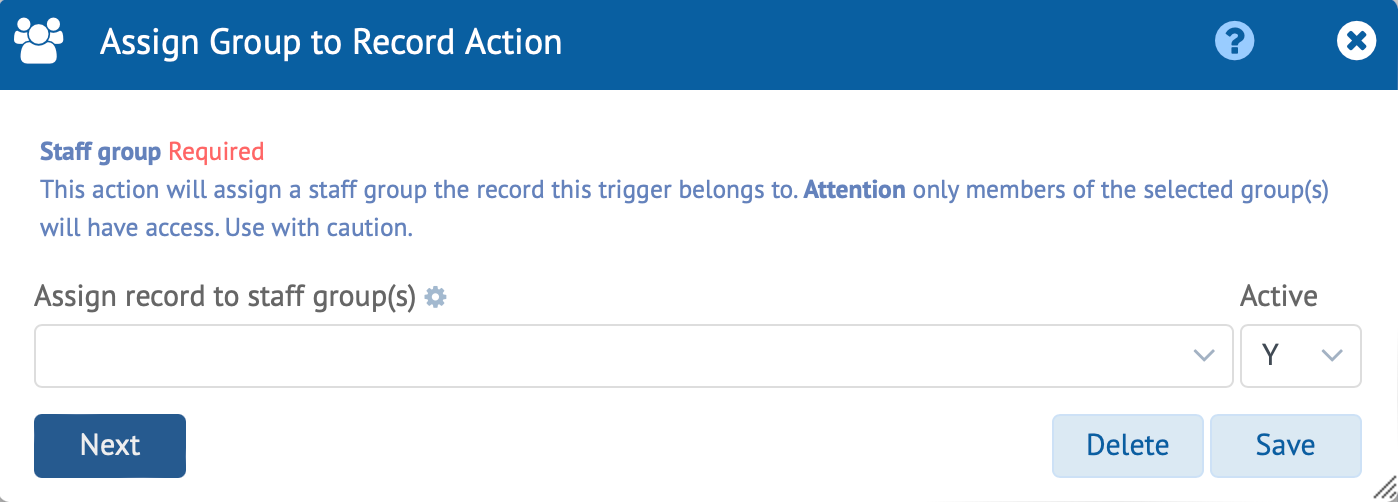
Set a Field Value
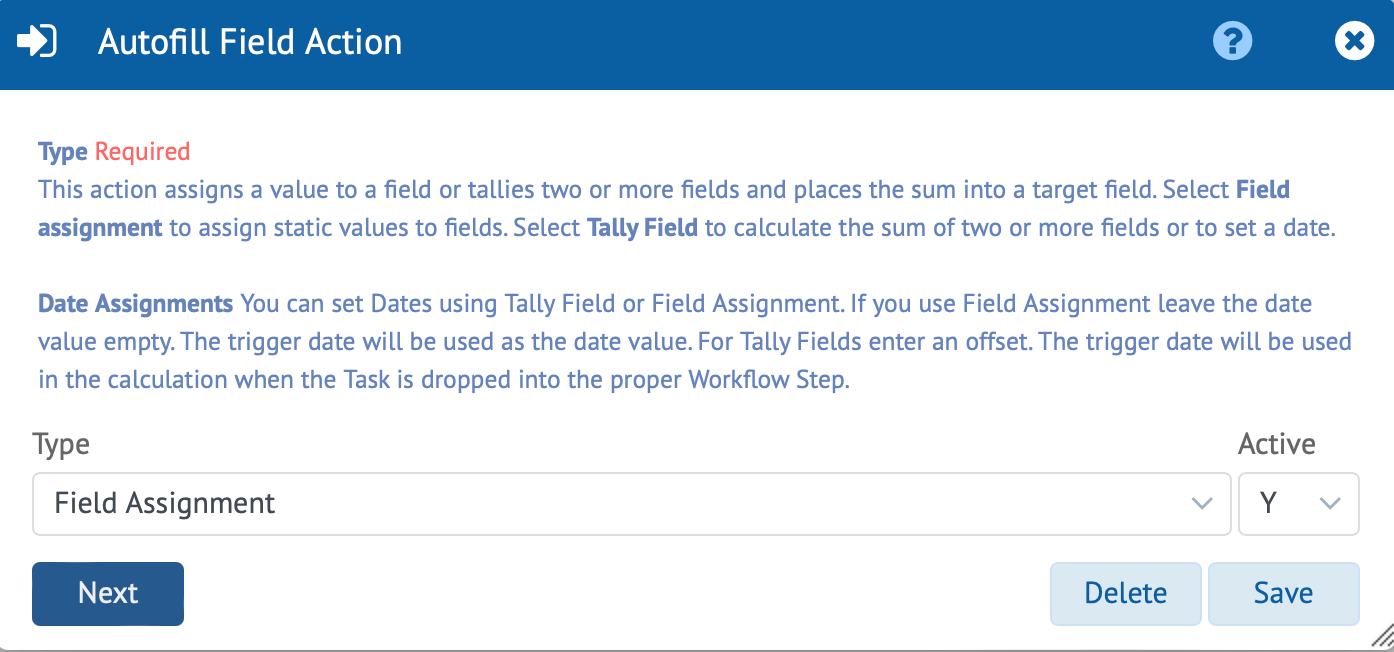
Show Hide Fields
Display Popup Message
Returning to the Workflow Template Window
When you are done adding your optional Automation Routines to your Task.
Click the Save icon in the Workflow Task form’s titlebar as depicted in the screen grab below. This will return you to the Workflow Template Screen.

At this point you can choose to save the Workflow Template or you can click the 3. Add Task button in section 3 of the Workflow Template panel again to add another Task to this template.
If you are satisfied with the Workflow Template and all the Task click the Save button in the Workflow Template panel’s titlebar.

To return to the Workflow Manger click the Back button in the Workflow Manager Template panel’s titlebar to return to the Workflow Manager screen. This is where you started. Great job.
The Workflow Manager
You can click the New button in the Workflow Manager’s titlebar to create a new Workflow Template.

To close the Workflow Manager and return to the Workflow Template click the Close icon in the Workflow Manager’s titlebar.
When you close the Workflow Manager you are returned to the Matter form’s Workflow tab.
You may not see any workflow applied when you return if the matter you are in doesn’t match a Workflow’s Template classification criteria.
Please note that in some cases you will have to logout and back in for Workflow changes to take effect. Although you may have created a workflow template and you can see it in the Workflow Manager window, it isn’t loaded. This is because we do not allow new Workflow Triggers to fire in the same session they were created.
Back to where you started
Test your work. Create a test Matter or select one and set the classification fields to match any Workflow Templates Classification criteria. The Workflow tab of the test matter should load and create the required todo records in the Workflow Kanban and Todo list.
This concludes this lesson and documentation on HoudiniEsq Workflow. Thank you.


Best Practice Tip
Use a test matter for all your testing. Start by adding your firm as a contact record. Then create a matter linked to this contact record as a party to the matter. Give the matter a unique name so you can recall at will and with ease anytime you wish to try or test a feature. This provides an easy way to test functionality without the risk of altering an important record while experimenting.
Admin Tutorials
How do I create Workflow?
Creating and managing workflow is easy. Learn how to automate task such as generating docs, sending emails, notifying staff, and so much more.
How do I add fields to forms?
Creating and managing record types is easy. To edit an existing type select it from the combo and hit enter. To add a new type enter the name and hit enter.
"A great innovation for the department. We handle over 100,000 cases annually. HoudiniEsq has made the department more effective and efficient. The department saves over $750,000 annually."
Director, Department of Fair Employment and Housing
