How Can We Help?
HoudiniEsq Matter Contracts
Matter Contracts
Request, Approvals, and Amendments
Introduction
Document contracts are typically contracts between the organization and an outside party such as a vendor or an expert witness. In the following tutorial, we will discuss creating contract requests, the approval process, editing, and amending contracts in HoudiniEsq.
Adding Contracts to Matters
All Contracts Begin with a Contract Request
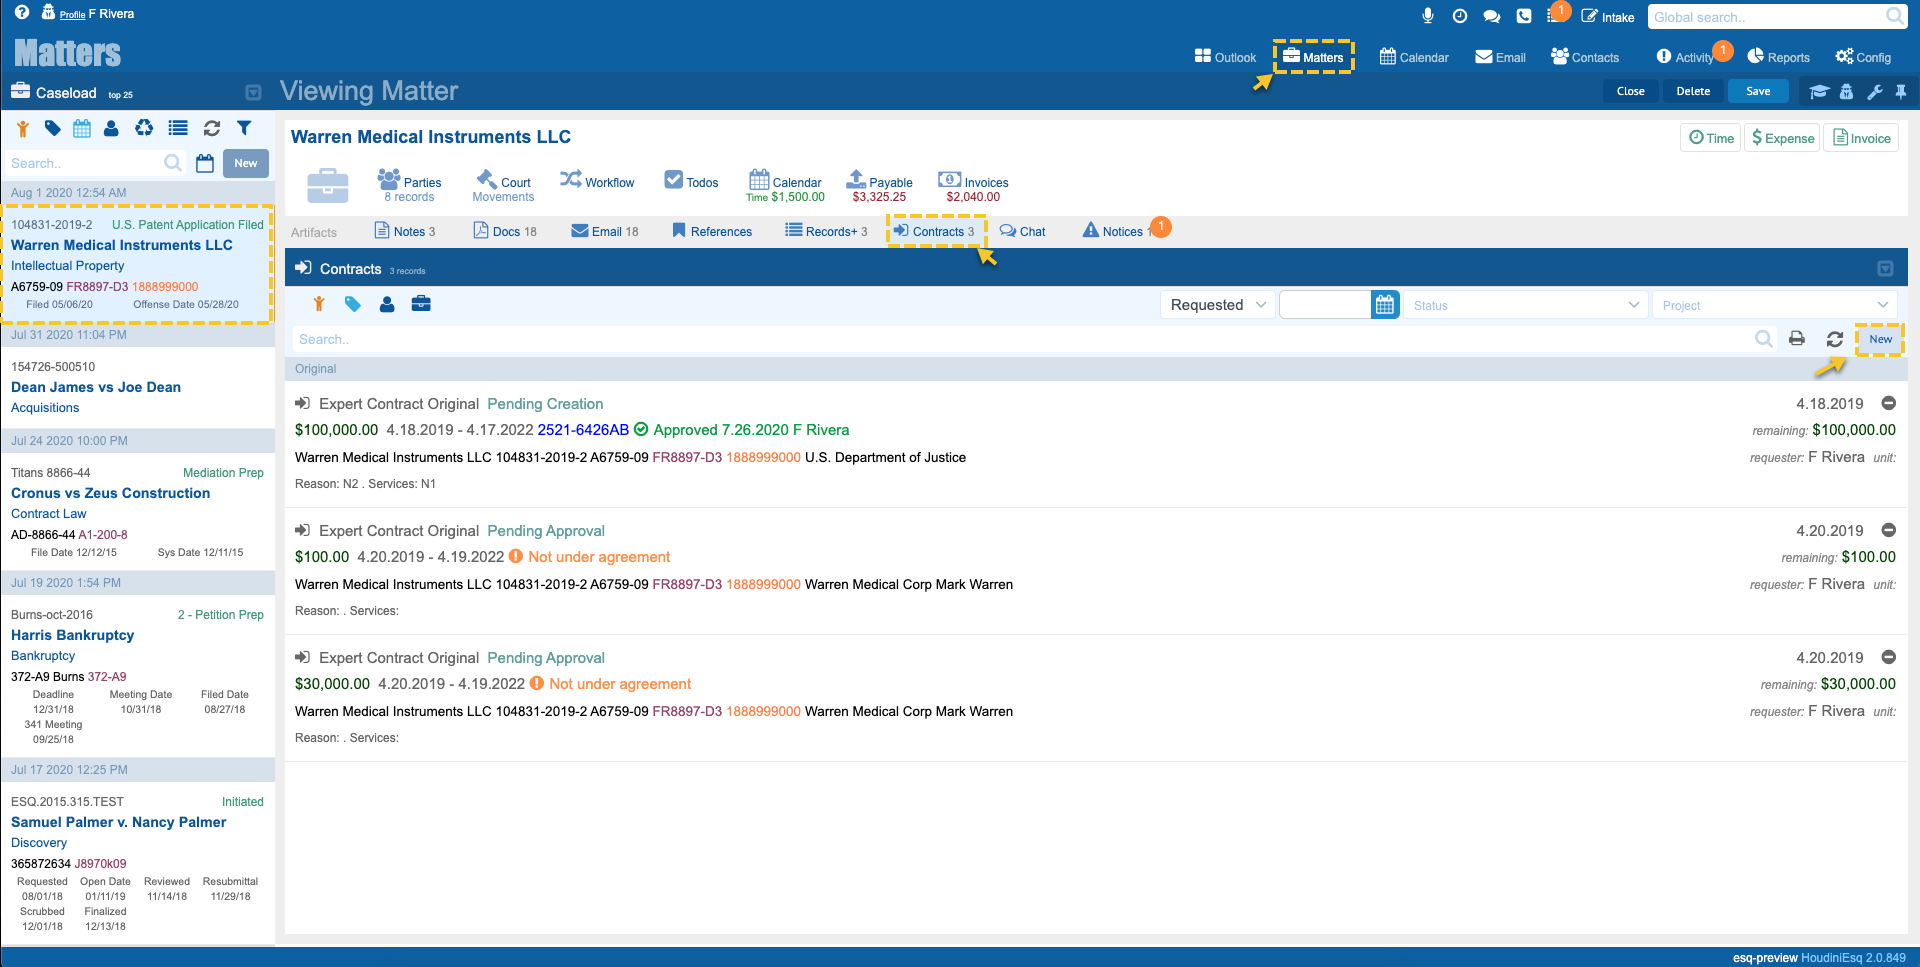
Contracts are always associated with a matter. To begin a Contract Request locate the matter you would like to make the request for. Under the Artifacts area below the matter form’s main toolbar select Contracts as depicted in the image below.
1. Select associated matter.
2. Select Contracts in the Artifacts menu.
3. Click the New button above the list.
The Contracts tab of the Matter displays all active and inactive contracts, along with their status, remaining contract amount, the requestor, and other critical information. Click the New button in the upper right-hand corner of the contract list.
The image below depicts the list of contracts for the given matter.
Clicking the New button opens the Contract Request form. All Contracts begin with a Contract Request.
Contract Request
Defining the Contract’s criteria and Creating a Contract Request
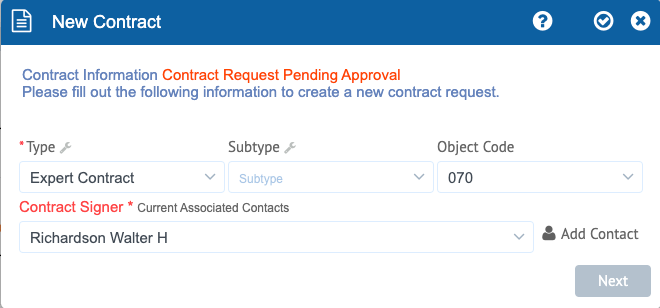
The first screen of the Contract Request wizard will ask you to define the Type of Contract and optionally define a Subtype and Object Code for the contract.
The next vital piece of information is the Contract Signer. This is the individual that is named in the Contract. For example, if the contract is for an Expert Witness then the Expert Witness is the Contract Signer. Choose the appropriate individual from the list of currently associated contacts/parties.
IMPORTANT Only contacts/parties associated with a matter can be selected. If the individual is not listed in the dropdown click the Add Contact button. This will add the contact to the matter and will allow you to select the individual under the Contract Signer field once you have specified the contact’s relationship to the matter e.g. Expert Witness.
Click the Next button to continue with the contract request.
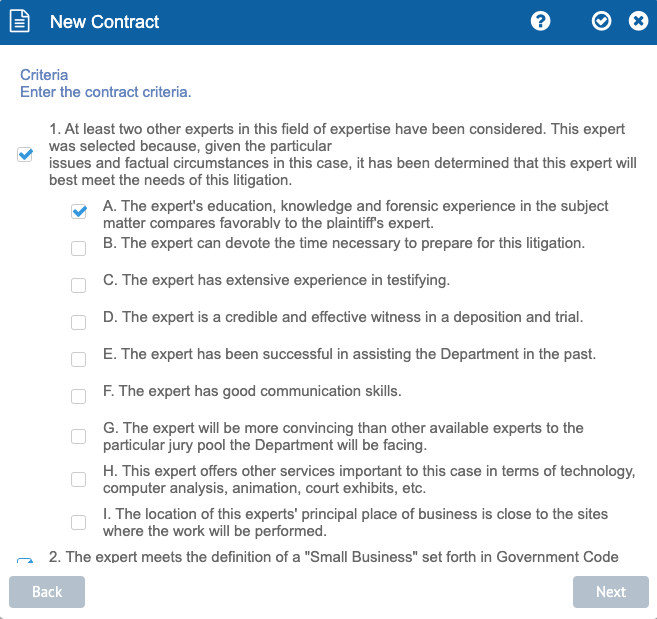
The next step in the process is to define the criteria for the contract. This criterion is important to fill it out to the best of your ability and knowledge. This information will be used during the contract approval process. You can always return to the contract later and make changes if the need should arise.
Note that selecting certain options will cause additional sub-options to appear.
The following screen depicts the Contract Criteria step. Click the Next button to continue.
In this step, you must define the parameters of the contract. Enter the term of the contract by selecting the start and end dates.
Enter the total contract amount. The total will be broken down by the number of years in the term by default. Adjust the figures in each fiscal year field as you see fit. Make sure the values in all the fiscal fields total the contract’s total amount. The Fiscal Total field and Contract Amount field should contain the same value as depicted in the image below.
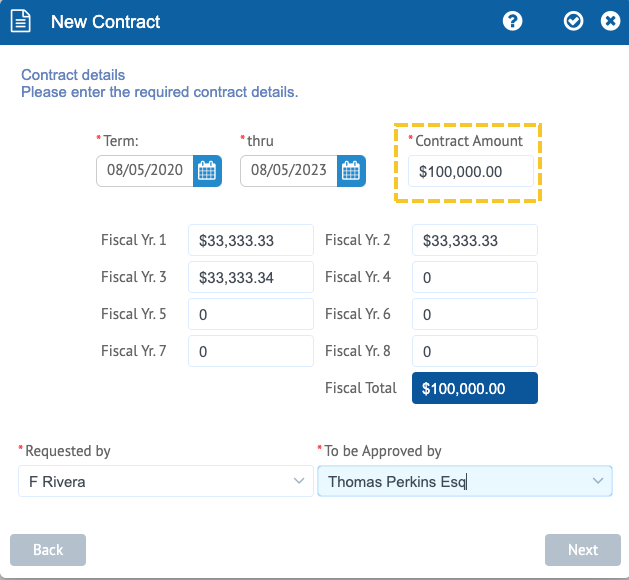
The next step is to select the staff member making the request. HoudiniEsq will fill in your name by default but you may make the request on behalf of another staff member.
The next step is selecting the staff member that will approve the contract request. Select a staff member form the To be Approved by field.
IMPORTANT Only staff that has approval authority for the amount of the contract will be listed under the To Be Approved by field. If the staff member isn’t listed they do not have the authorization to approve the contract amount.
Click the Next button to move onto the final step in the Contract Request process.
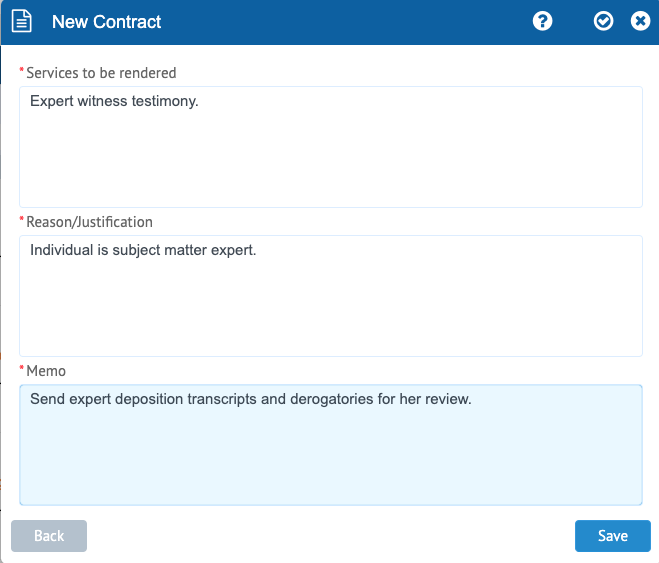
The final step of the Contract wizard requires that you provide the services to be performed, the reason or justification, as well as any notes that are relevant.
Enter the services to be rendered, a reason and justification for the contract, and any notes into the memo field. Once you’ve entered the appropriate information, click the Save button to complete your Contract Request.
You will be returned to the matter’s contract list as depicted in the image below.
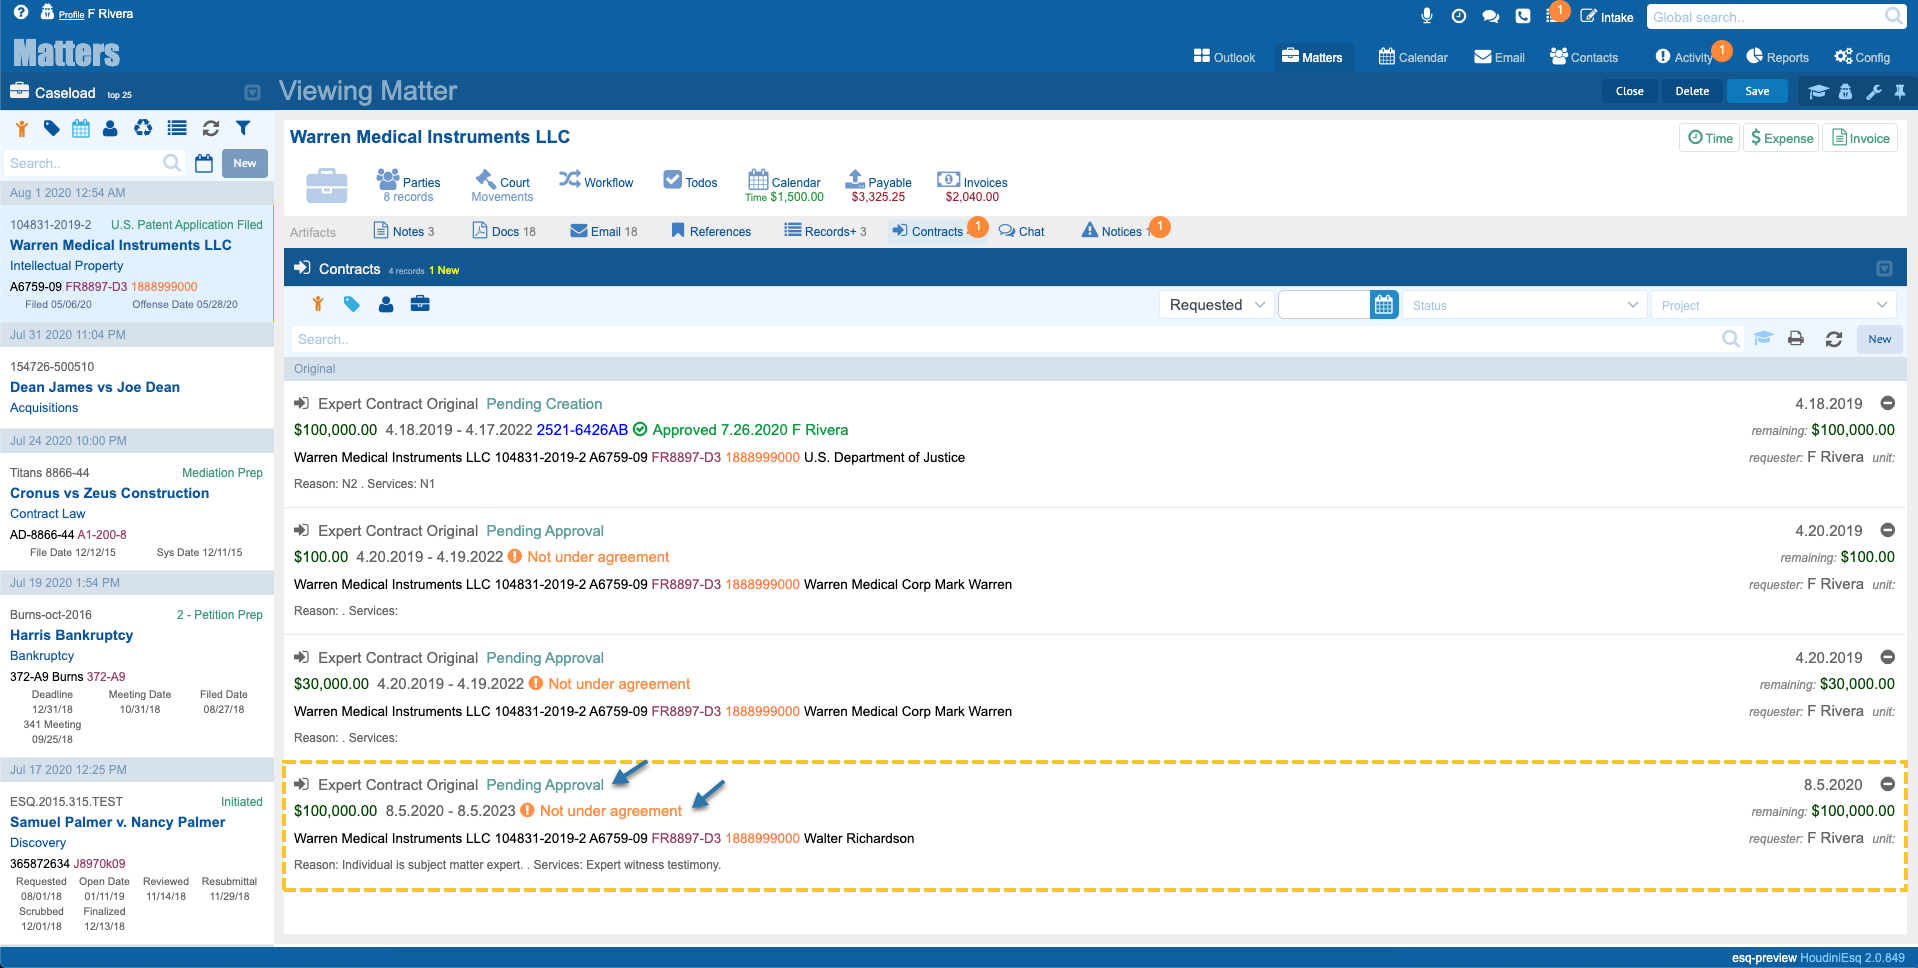
The contract list of the matter will list all contracts associated with the selected matter. As you can see in the image above that our newly created contract request states that it is Pending Approval and Not Under Contract as well as other vital details.
Let’s take a look at the contract approval process.
Contract Approvals
Staff Approval Authorizations
The staff member that was selected as the individual to approve the contract, the “To be Approved by” will receive a notice under their Activity Dashabord indicating that a contract request is pending as depicted in the image below.

The notice received is a Contract Amendment Approval Request and the amount of the contract. In the above image, the request is for an amendment change.
To approve the contract request click the checkmark icon next to the Approve Now text on the notice’s right-hand side, below the notice’s date.
The requester will in turn receive a notification that the Contract Request has been approved.
When the contract is approved, it will appear under the Contracts tab of the associated Matter with the status “Pending Creation”. If you are a member of the Contracts Analysis group your Activity Dashboard will include a contracts list. All contract requests can be managed from this panel.
Contract Analysis staff use the Contracts list under their Activity Dashboard to manage contracts.
Contract Analysis and Management
Editing and Managing Contract Details
Contracts can be managed under the associated matter or from the Activity Dashboard if you are a member of the Contract Analysis group.
The image below depicts the Contracts Module under the Activity Dashboard. This is the Contracts Analysis team’s central hub.
This panel allows you to search by all sorts of criteria. You can search by text, matter reference or ID, contractor or contact, status, record state, and by organizational unit.

For the remainder of this tutorial we will access matter contracts from the matter contracts list.
To begin locate the matter and navigate to contracts. Double click the contract to open its details as depicted in the image below.
The contract criteria are displayed. The Contract Signer, the initial term, and the initial amount are displayed as well as is the justification and memo fields. You will notice that the form’s toolbar includes Revisions, Parties, and Invoices. Click the Revisions tab to view all the contract revisions for the given contract.
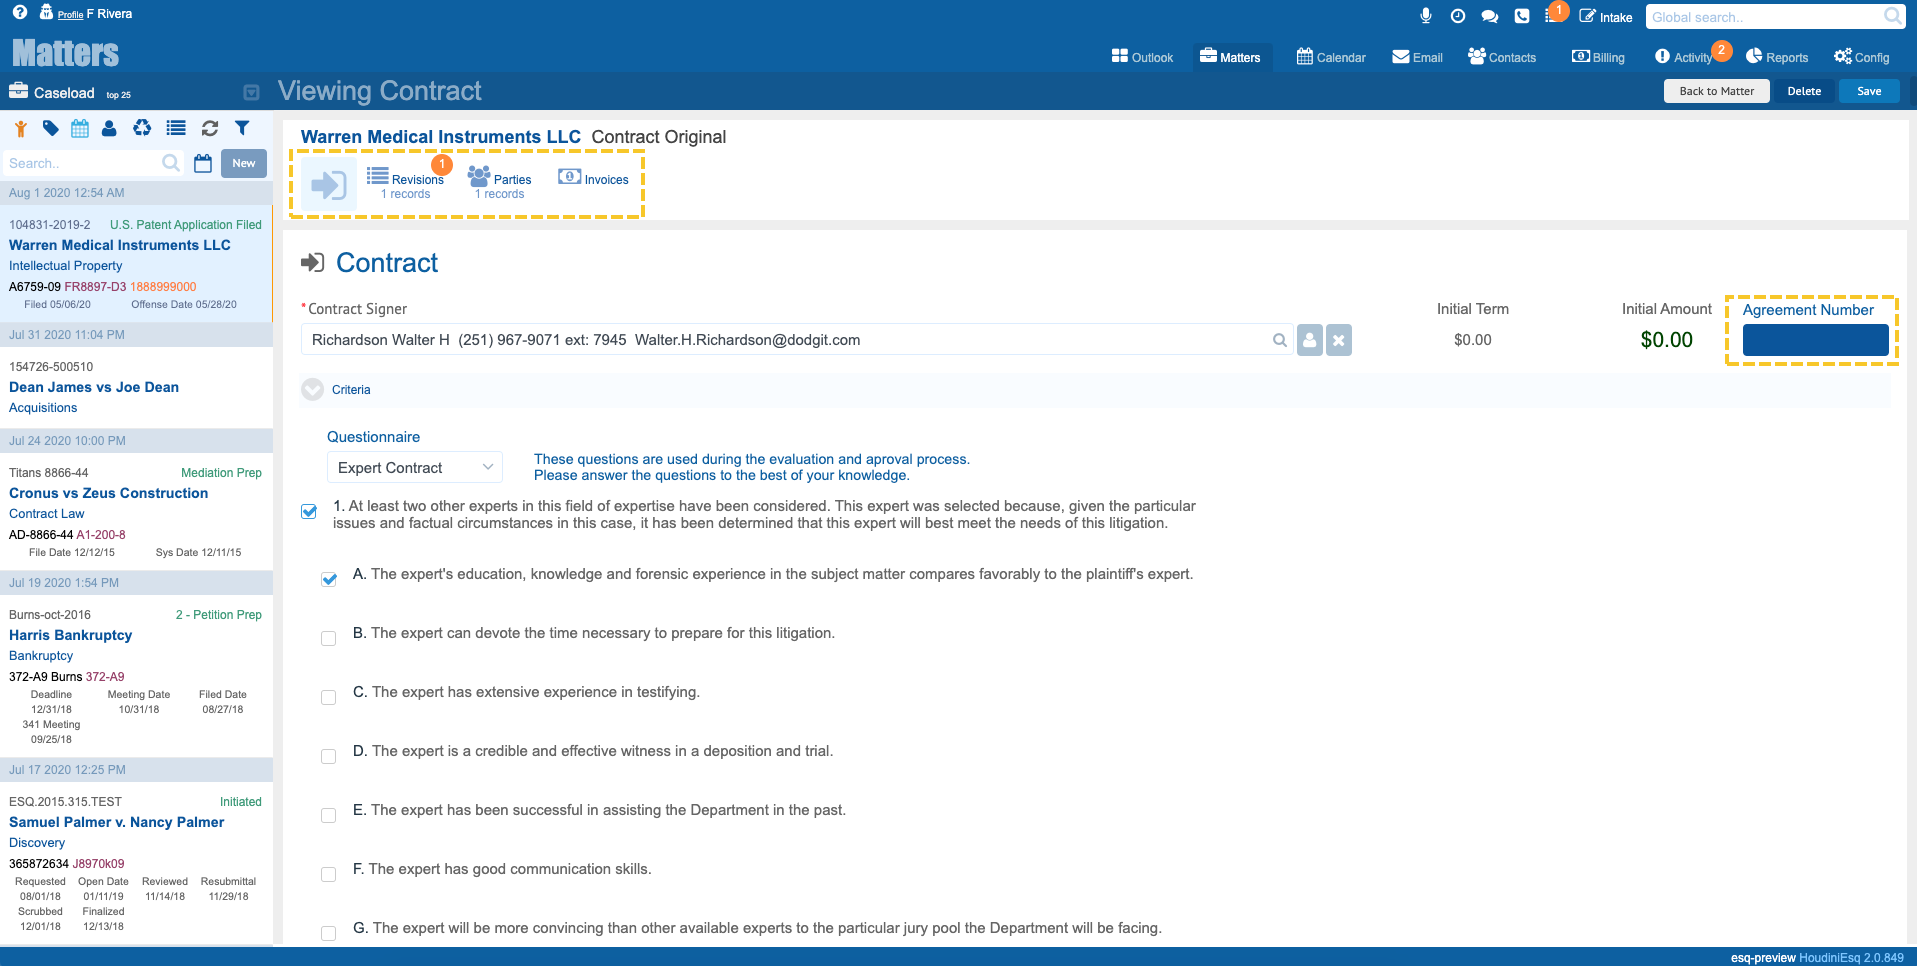
Click the Revisions tab to view all the parameters and revisions for the given contract.

Note that the first entry is listed as Original. This indicates that it is not an Amendment and is the original parameters of the contract.
If you wish to amend this contract you begin by clicking the New button from the Revisions list.
To view the revision details of the contract double click an item in the list to open the contract parameters form as depicted in the image below.
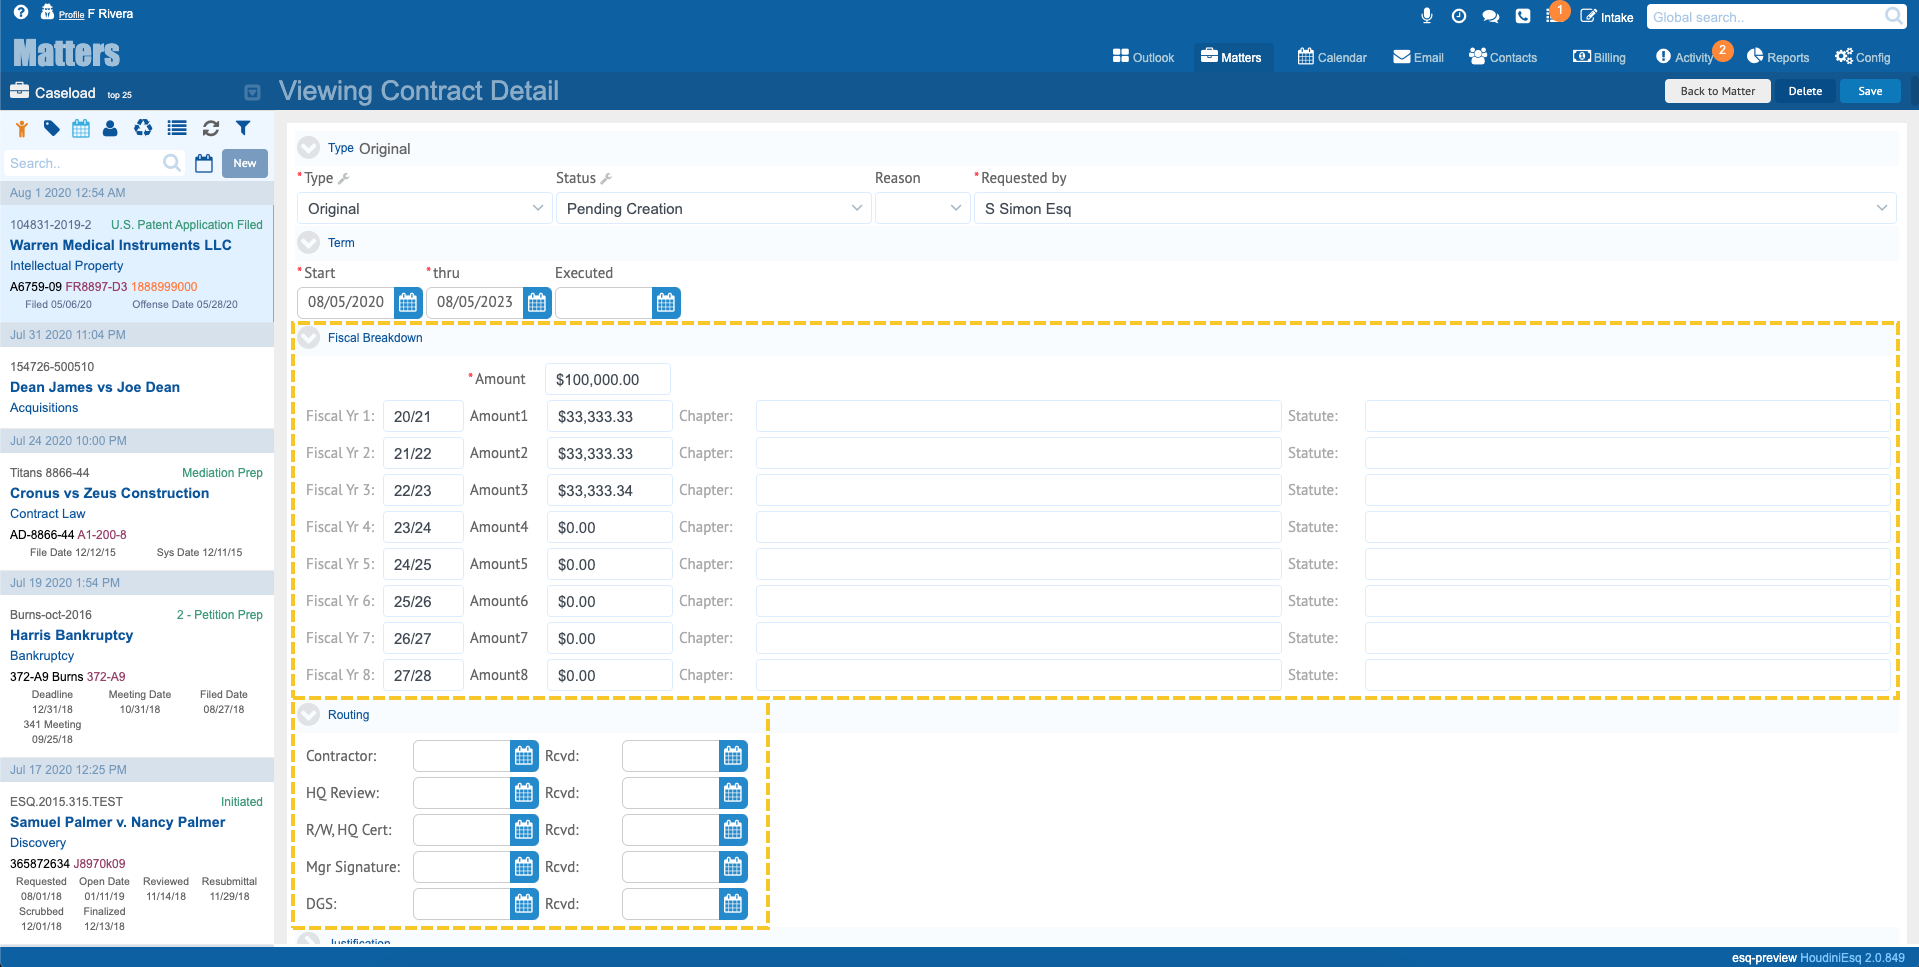
Use this form to adjust the fiscal breakdown and enter any statute information. The Routing section of the form is used to track the contract’s route as it is reviewed. As the routing dates are filled in the status of the contract will change to reflect the stage the contract has entered.
For example, entering a set of dates on which the Contractor was assigned will result in the Status changing to “Waiting for Contractor”. In this case, the contract has been sent to our Expert Witness to be signed.
When you have completed your changes click the Save button to save your changes.
Printing Contracts
Generating Contracts from Contract Templates
To print contracts and contract amendments navigate to the Contract and select the Docs tab of the contract. This will reveal the list of documents associated with this contract. IMPORTANT Documents associated with a contract are only listed under the Contract’s Docs tab. Contract documents do not appear under the Matter’s docs tab.
To upload or create a contract document click the Docs tab and then click the Create or Upload button.
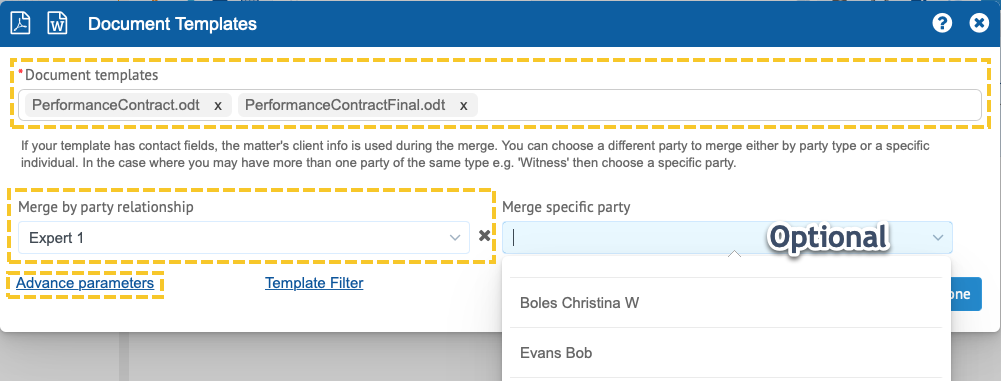
If you wish to create one or more documents from contract templates click the Create button to open the Document Template form.
Select one or more templates to generate. If the contract signer is the primary contact you don’t need to do anything more, simply click the PDF or DOC button to generate the document(s). However, if the party is not the primary contact click Advance parameters and then select the party to include in the contract when it is generated. You can select by party type e.g. Expert 1, or by a specific party. IMPORTANT If your contract templates tokens call for the party by type e.g. Expert 1 then select the party type from party relationship dropdown.
Click the PDF or DOC button to generate the document(s).
After the documents have been uploaded or created you will be returned to the Contract’s docs tab where your newly uploaded or created docs are listed as depicted in the image below.

Contract Amendments
Amending Contracts
To amend a contract navigate to the contract either via the associated matter’s contracts tab or from the Activity Dashboard under contracts.
From the associated matter:
1. Click the contracts tab.
2. Double click the contract you wish to amend.
3. Select the Revisions tab.
4. Click the New button above the list.

Double click any contract in the list to open the contract. Click the Revisions tab. As depicted in the image below to reveal the list of revisions. Click the New button to add a new revision in this case an Amendment.

The image below depicts the Contract Detail for the Amendment. Fill out all the required fields and click save.

After clicking the Save button you are returned to the Contract’s Revisions list which now includes your Amendment. The Contract Request and Approval process are then followed as described earlier in this tutorial.

Adding Invoices to Contracts
Managing the Remaining Balance of a Contract
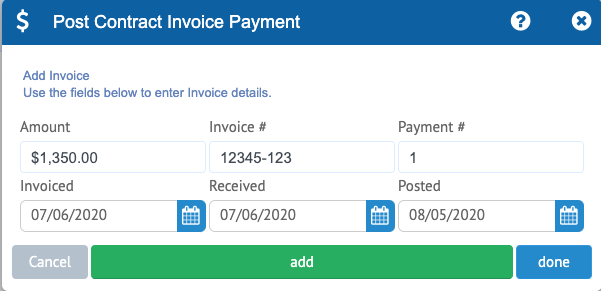
Keeping track of the contract balance requires that invoices received under the contract be entered into the system. You begin by navigating to the contract and clicking the Invoices tab. Above the list click the New button to reveal the Invoice entry form.
Enter all the pertinent information.
IMPORTANT Invoice entries are typically made when the invoice is paid not before then. This ensures that staff always know what the actual balance on the contract is. When you are done entering the information click the Add button.
You will notice that the Invoice form does not close after clicking the Add button. This is so you can enter several invoices in one go. When done click the Done button to return to the Invoice list of the selected Contract. The Contracts balance will reflect the new balance.

Administrator
Approval Authorizations
Setting Staff Approval Authorization Limits
Any matter members can make a request for a contract. The amount that can be requested and the amount that can be approved are monitored values. The first step in enabling contracts in HoudiniEsq is to define which staff members can approve contract requests and how much they are authorized to approve.
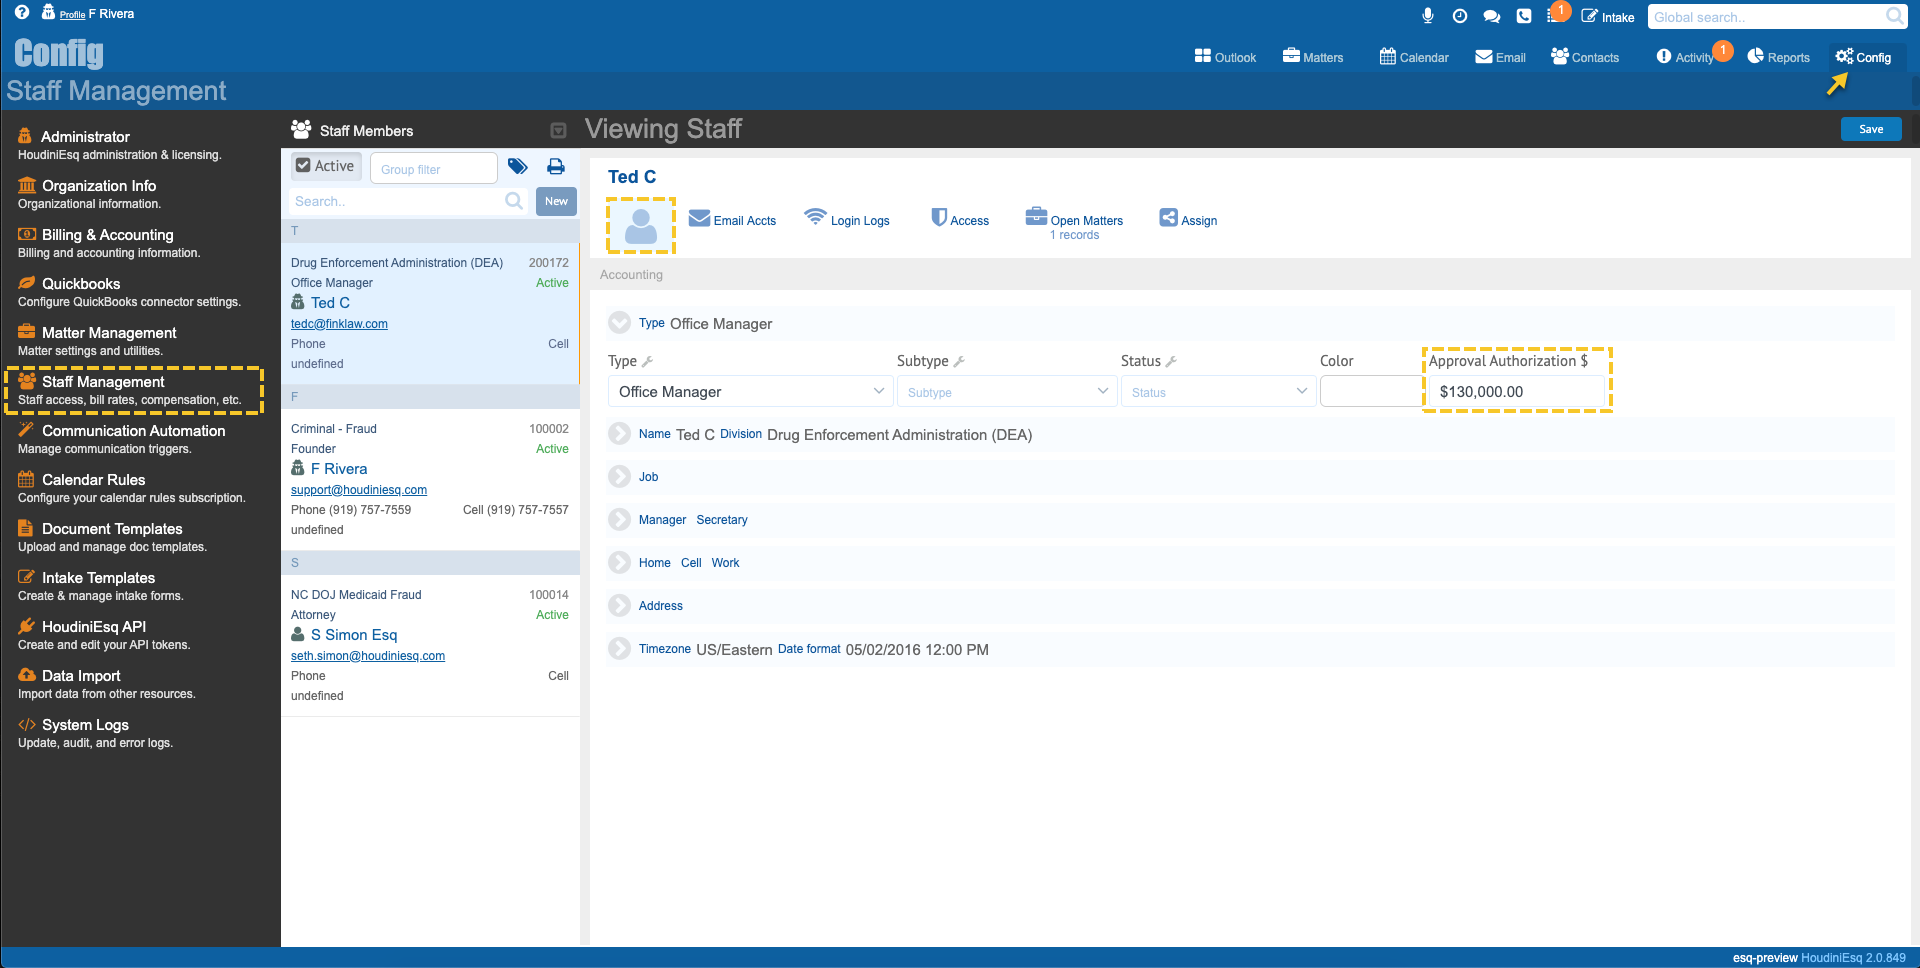
1. To get started navigate to Config–Staff Management. IMPORTANT: You must be a member of the Admin group to make staff record changes.
2. Select the staff that will approve the contract request and navigates to the detail tab. Click the staff|user icon above the form.
3. Click the Type section to toggle the visibility of the field. Set the Approval Authorization Amount to the max amount this user can authorize.
4. Click the Save button.
The image below depicts the Staff Management console and the associated Approval Authorization field.
The next step is to ensure that the staff member is a member of the appropriate groups to have access to Contracts, Requests, Approvals, Documents, Amendments, etc. To begin to navigate to the Access tab of the staff record. Under Group Level Access select one or more contract groups the staff member is to be added to. The image below depicts the Access tab of the staff record form.
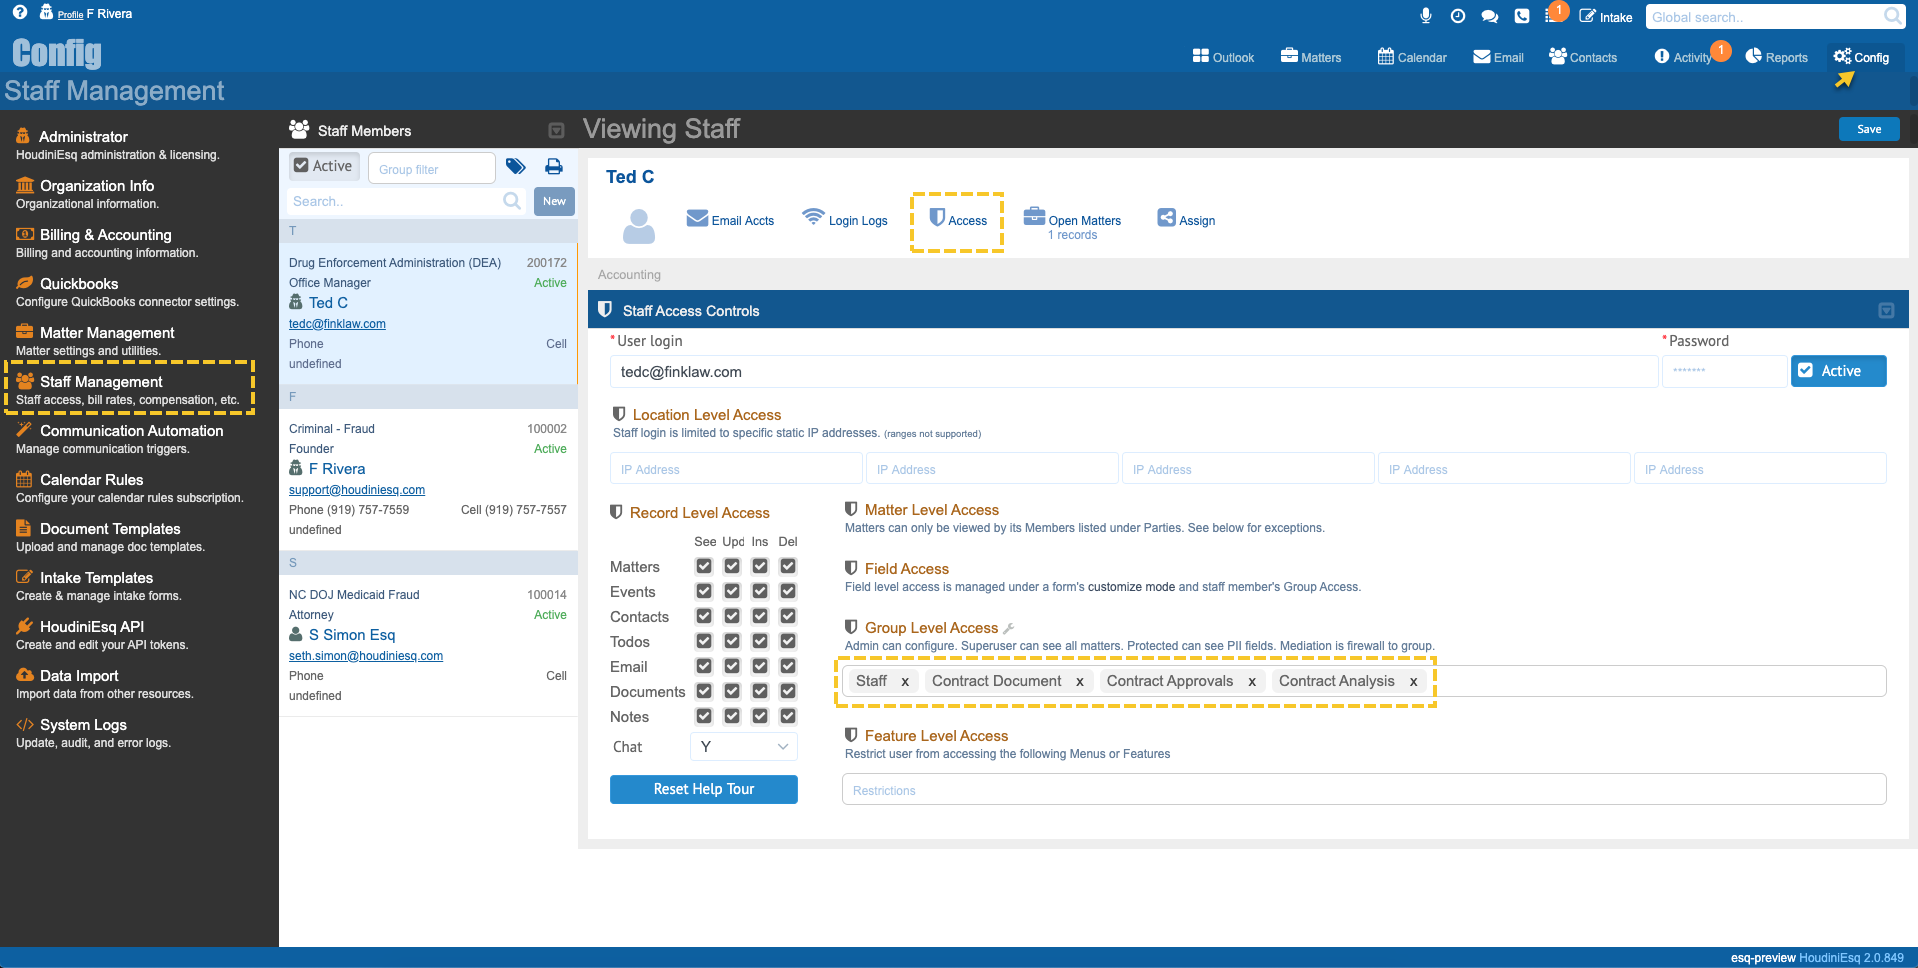
The following are the supported groups and their level of access.
Contract Analysis This allows users to open, view, and edit Contract Details.
Contract Document This allows a user to create and print out Contracts via templates in the Documents tab of the Contract record.
Contract Approvals This group gives specific access to approve requested contracts. The approval amount is controlled by the corresponding field noted above in the Details tab of the Staff record.
Repeat this process for all staff that will make contract request approvals.
Frequently Asked Questions
Beyond the basics but in byte size chunks of information.
Configuration
Installation and setup
Customization
Visualize your data intuitively
Developers
API and SDK
